
Nature Neighbors Knowledge Center
Completing your Nature Neighbors Certification Checklist shouldn't just be about ticking boxes. The process itself is meant to be an educational (and enjoyable!) one.
Use the information and resources found in the drop-down menus below to learn how you can create the best possible wildlife habitat. Even if you don't plan to pursue Nature Neighbors certification, these tips and resources can help you become a great land steward.
Need more help? Don't hesitate to reach out to our Nature Neighbors coordinator at sroberts@bentonswcd.org / 541-753-7208 x205. We're here to help you succeed!
We also have an active and knowledgeable group of site stewards at our Nature Neighbors Facebook Group. Join us there!
Click each heading to reveal more information. Click the heading again to hide that section.

Remove invasive species
Invasive species, also known as non-native, are species that were not found in the area before European colonization. The Oregon Department of Agriculture estimates that Oregon spends $81 million annually on the control of invasive species.
Invasive plants have a number of negative impacts on native species and the ecosystem including:
- Competition and Displacement: Invasive plants often grow aggressively, outcompeting native species for resources like sunlight, water, and nutrients. This can lead to the decline or even extinction of native plants.
- Habitat Degradation: Invasive plants can alter habitats, making them unsuitable for native species. For example, dense mats of invasive aquatic plants can reduce oxygen levels in the water, harming fish populations.
- Food Web Disruptions: Invasive plants can disrupt food webs by providing poor or toxic food sources for native herbivores or by outcompeting plants that provide critical food sources for native animals.
- Soil Erosion and Water Quality: Many invasive plants have shallow root systems that are less effective at holding soil in place than native plants, leading to increased soil erosion and runoff into waterways. This can also affect water quality.
- Increased Fire Risk: Some invasive plants, like certain grasses, can create more flammable fuel loads, increasing the frequency and intensity of wildfires.
- Economic Impacts: Invasive plants can reduce agricultural yields, impact recreational opportunities, and cause damage to infrastructure, leading to significant economic losses.
By removing as many non-native species as possible from your habitat, you'll make way for native plants and wildlife, leading to a stronger and healthier ecosystem.
Learn more about invasive plants
Each of these links will go to the plant's profile in our Invasive Species Database. There, you will find pictures and information that will help you identify and remove each species. If you need more information about any of these species, just reach out!
*If found, please report to us! These species have been designated as priority "Early Detection/Rapid Response" plants.
.png?ixlib=rb-1.1.0&w=2000&h=2000&fit=max&or=0&s=7b941412f8dd3316c2f222061a2bb2a6)
With thousands of species of plants in the Willamette Valley alone, it can be hard to know what's what! Use the below links to learn how to identify both native and unwanted non-native species at your site.
PHONE APPS
ONLINE DATABASES
PNW weed identification module (OSU)
pdfs
Gardening with Oregon Native Plants West of the Cascades
Native Plants and Trees of Oregon
Native Plants for Willamette Valley Yards
books
Trees and Shrubs of the Pacific Northwest
Some weeds are very difficult to eradicate without herbicides, but it's often possible! Use these methods to clear your habitat of invasive species without toxic herbicides.
1. Pull newly emerged weeds as soon as they appear. The more you can weaken the roots by depriving them of sunlight-capturing leaves, the quicker the plant will die.
2. Get the entire root. For plants that have deep taproots, such as thistle, be sure to dig out and remove the entire root/rhizome. Tools such as a 4-claw stand-up puller can be very helpful for this.
3. Dig deep and wide. Some plants, like Italian Arum, have numberous mini-bulbs or extensive root systems. Dig out an area several inches wider than the root ball, and throw away the entire mass of dirt and roots.
4. Throw weeds away in the trash. Do not add them to the compost! Some species are so resilient, they can survive composting and re-sprout when you add the compost to your garden.
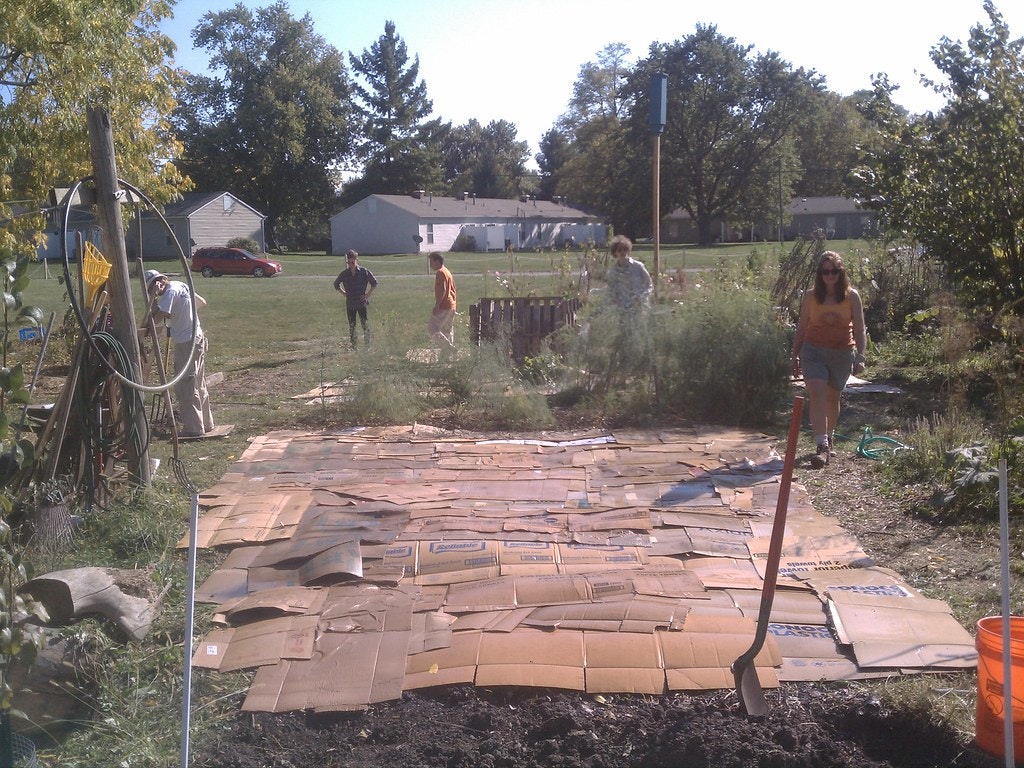
5. For large areas, use the sheet mulching method. Sheet mulching, or "lasagna gardening", is the process of using layers of cardboard and mulch to smother weeds. Mow the area as low as possible, lay cardboard over the top, and add at least 3-4" of mulch and/or compost (6" or more is better). For really stubborn areas, you can repeat this pattern with multiple layers of cardboard and mulch. Leave this in place for at least 3 months, ideally over the summer. In the Fall, you can plant your new native plants directly into the mulch and decomposing cardboard.
Learn more about sheet mulching
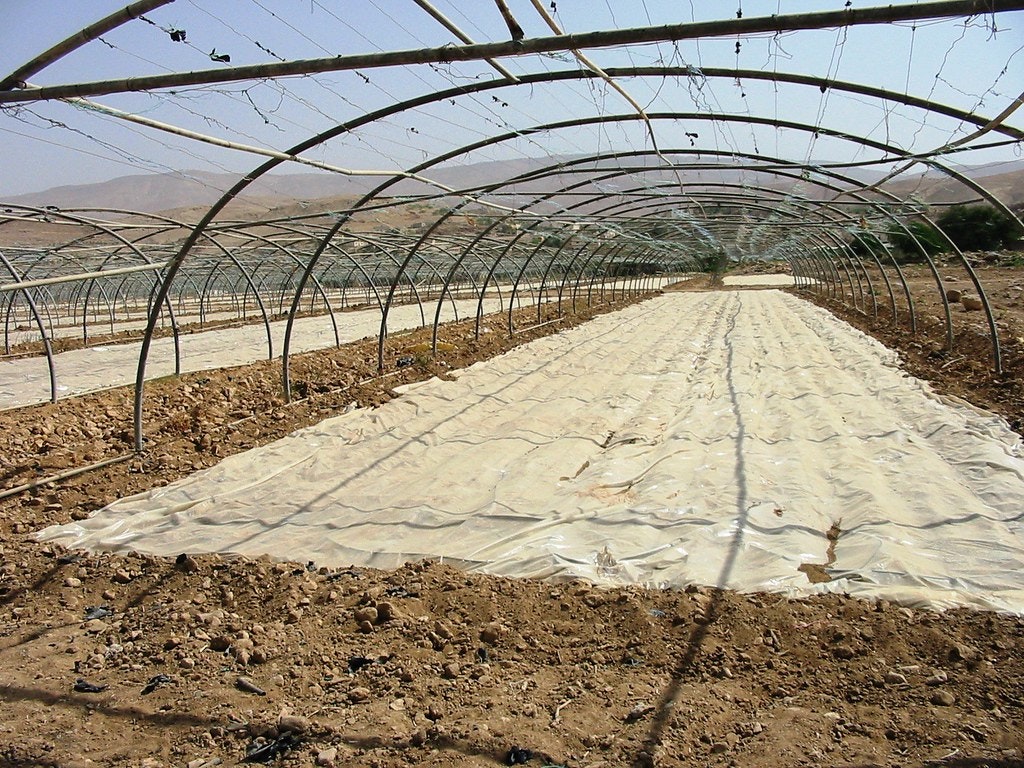
6. For really difficult weeds, such as bindweed or knapweed, try solarization. Solarization is the process of killing weeds by heating them beneath plastic. Get a sheet of CLEAR plastic a bit larger than the area you want to treat, lay it over the area, and secure the sheet along the edges with landscape staples. Do this at the beginning of summer to give the area plenty of time to "cook". In the Fall, remove the sheet, mow or lightly till the area to clear it, and plant your natives.
Still struggling to control your weeds?
In some cases, extremely noxious weeds may need to be eliminated using carefully-applied, targeted herbicides. Unless you have prior knowledge about these chemicals and their applications, you should not attempt this on your own. Reach out to our Plant Programs Coordinator Cierra for help with choosing and applying herbicides in your habitat.
For more information, see "Solve Pest Problems" at Oregon State University

Plant native species
To qualify for Nature Neighbors certification, your habitat area must be at least 50 square feet and comprised of at least 80% native species. We calculate this by the total number of species, not the number of individual plants. For example, if you have 10 plant species, at least 8 of them should be native. To calculate your percentage of native species, count how many native species of plants you have, and divide this by the total number of plant species present in your habitat. If the number is above 80, you're good to go!
You must include at least EIGHT of the plant types listed in the Certification Requirements in your habitat. Each plant may only count as ONE type, even if it actually serves many purposes in the ecosystem. This is to encourage you to plant as many species as possible to build diversity and landscape resilience!
We know - that's a big number (more than some other habitat certification programs require). We made this choice deliberately based on the best available current research, which shows that native plants aren't optional for wildlife and environmental health - they're essential.
Many wildlife species cannot survive without specific native plants.
This is especially true for insects, which form the base of the food web. Non-native ornamentals may look lush, but many are biological deserts, offering little or no food value. Most native insects are specialists, evolved to eat only certain native plants. Caterpillars—the primary food source for baby birds—often require one genus or even one species of plant.
DID YOU KNOW? A single brood of chickadees needs 6,000–9,000 caterpillars to raise their young!
Plant natives → insects return → birds, bats, amphibians, and mammals follow.
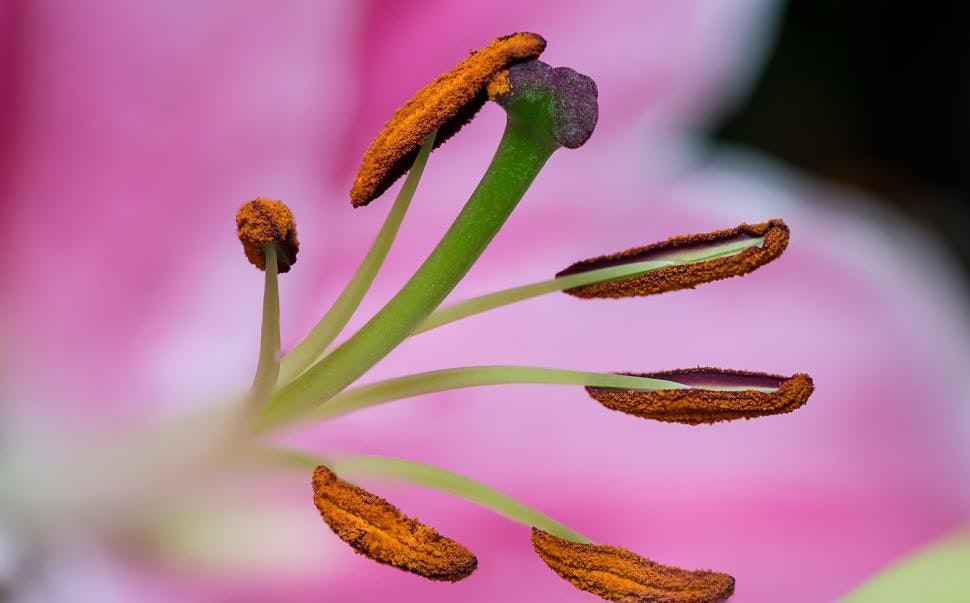
Native plants support far more pollinators than non-native species.
Native plants produce nectar and pollen with the right chemistry for local bees, butterflies, moths, beetles, and flies. Many native bees are solitary and ground-nesting—they rely on native vegetation structure and undisturbed soils. Diverse pollinators mean more resilient food systems, from backyard gardens to regional agriculture. Replacing non-natives with natives directly combats pollinator decline.
Native Plants Protect Water—Above and Below Ground.
Native plants are climate-adapted engineers. Their deep, fibrous root systems increase soil infiltration and reduce runoff. They filter pollutants before water reaches streams, rivers, and groundwater. Native vegetation reduces erosion, protecting waterways from sediment and nutrient overload. And as a bonus for you - landscapes with natives require less irrigation, conserving water during dry seasons.
NATIVE PLANTS BUILD SOIL HEALTH.
Native plants evolved alongside local soil microbes and fungi. Their roots feed mycorrhizal networks that improve nutrient exchange and carbon storage. Increased organic matter improves soil structure, reducing compaction and increasing drought resilience. Deeper roots lead to cooler soils, a healthier microbe community, and long-term resilience. In short, a turf lawn only skims the surface, while a mixed native ecosystem is a living sponge, water reservoir, and carbon bank.
DID YOU KNOW? A standard turf lawn's roots only extend between 2-6 inches, while a native prairie averages a root depth of 3-10 feet!
Native Landscapes Are More Climate-Resilient.
Native plants are adapted to local rainfall patterns, seasonal temperature swings, and periodic flooding, drought, or fire. As climate extremes intensify, native plantings bounce back faster after stress, require fewer chemical inputs, and reduce maintenance costs over time. They are a future-proof investment!
NATIVE PLANTS ARE LOWER-MAINTENANCE IN THE LONG RUN.
More native species=fewer pests and less chemicals. Native ecosystems maintain natural predator–prey balance and attract beneficial insects, which control pests without pesticides. Reduced chemical use protects pollinators, pets, children, and water quality. Native plants don’t eliminate insects—they support the right ones.
DID YOU KNOW? The annual maintenance cost for a quarter acre of traditional turf lawn averages around $1500, while the same amount of native landscape costs an average of only $200-$500 per year.
In a nutshell - Replacing non-native plants with native species transforms yards from decorative space into functioning ecosystems—supporting wildlife, protecting water, restoring soil, and building resilience for the future. We hope you'll be inspired to meet our goal of 70% native species in your habitat - or maybe even 100%!
A native species is one that is known to have been present before Europeans colonized the area - for the Willamette Valley, this was in the early 1800's. Scientists determine whether a species is native to an area by using fossil records, historical documents, and both modern and historical maps.
For Nature Neighbors, we consider any species that is native to the state of Oregon a qualifying native species; however, we strongly encourage you to choose species that are native specifically to the Willamette Valley for the greatest wildlife and ecosystem benefits.
But how do you know if a plant is native to these regions? A quick internet search with the plant's name (be sure to include the Latin name) and "native range" will usually bring up the species' known range map. You can also use the Oregon Flora search tool to find range maps (plus habitat requirements and care information) for most plants.
All of the species suggested in this guide, as well as found in our Native Plant Database, are native to the Willamette Valley.
Planning for the Future
As the climate shifts, plant (and animal) ranges shift. For us, this means that species are slowly moving northward as the climate warms. In other words, species that are common in Southern Oregon but rare here will become more and more common. The impacts of these newly-common species are difficult to forecast. Currently, some scientists are recommending that home gardeners participate in "assisted migration" - planting species from further South that are likely to become more common here. You should use your best judgment when selecting plants from either the Willamette Valley, Klamath eco-region, or elsewhere, based on your own goals and site conditions.
Native wildlife relies upon the food products of plants for survival. Fruits such as berries are great for larger animals like birds and squirrels, while nectar and pollen are both vital for pollinators during different life stages.
Nature Neighbors certification requires that you include species that can provide these foods. Find a list of native plants that provide each of these resources below.
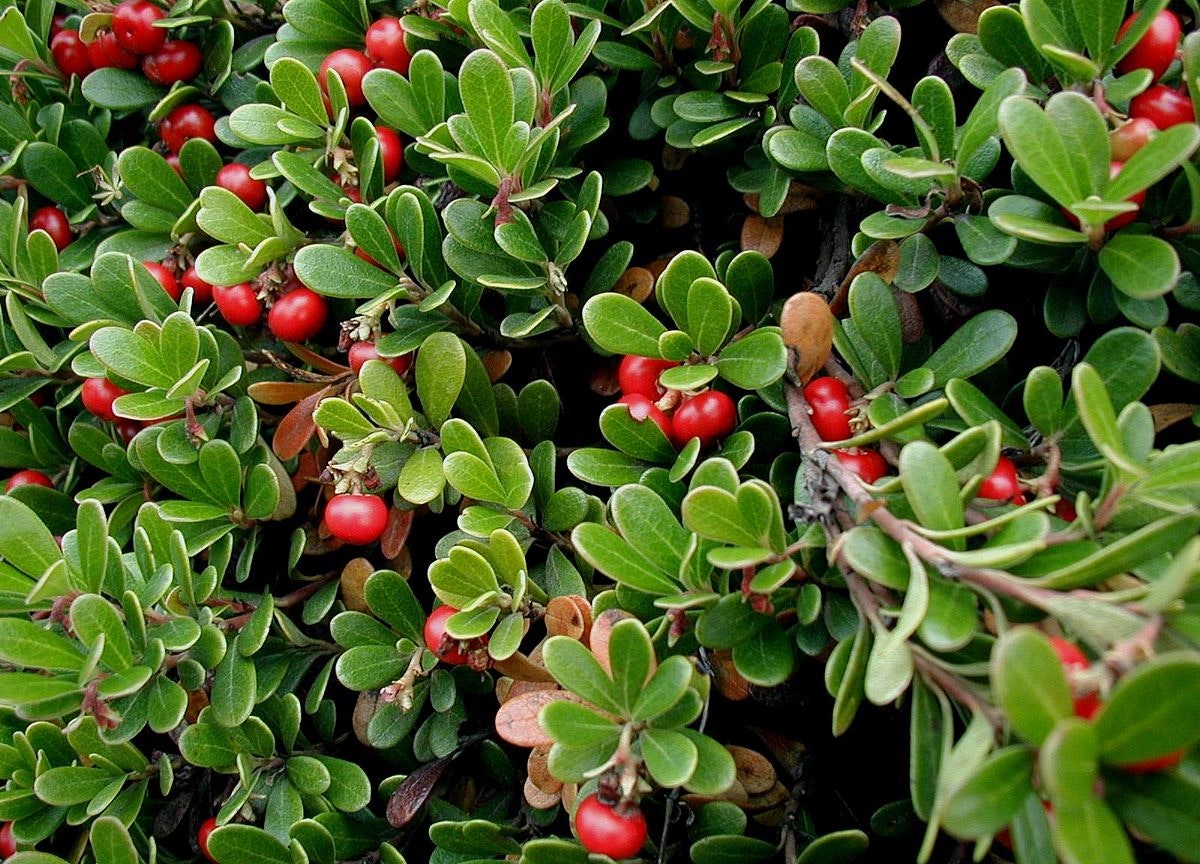
Fruit producers
- Salmonberry (Rubus spectabilis) – edible pink-orange berries
- Thimbleberry (Rubus parviflorus) – soft red berries
- Red Huckleberry (Vaccinium parvifolium) – tart red berries
- Evergreen Huckleberry (Vaccinium ovatum) – sweet black berries
- Blackcap Raspberry (Rubus leucodermis) – dark purple berries
- Trailing Blackberry (Rubus ursinus) – Oregon’s native blackberry
- Serviceberry / Saskatoon (Amelanchier alnifolia) – blueberry-like flavor
- Oregon Grape (Mahonia aquifolium) – tart blue berries (great in jam)
- Pacific Crabapple (Malus fusca) – tart fruit, often cooked
- Chokecherry (Prunus virginiana) – astringent but edible when cooked
- Western Strawberry (Fragaria vesca, Fragaria virginiana) – small wild strawberries
- Snowberry (Symphoricarpos albus) – white berries, toxic to humans
- Red-osier Dogwood (Cornus sericea) – white berries, wildlife food
- Elderberry (Blue) (Sambucus nigra ssp. cerulea) – edible cooked, toxic raw
- Twinberry Honeysuckle (Lonicera involucrata) – black berries, bitter
- Bitter Cherry (Prunus emarginata) – small bitter fruit for birds
- Ocean Spray (Holodiscus discolor) – not fruity, but seeds eaten by birds
- Pacific Madrone (Arbutus menziesii) – red-orange berries for birds
- Cascara (Frangula purshiana) – small black fruit, medicinal bark
- Oso Berry / Indian Plum (Oemleria cerasiformis) – early spring fruit, mild flavor
- Douglas Hawthorn (Crataegus douglasii) – small black fruits, edible but mealy
- Twining Honeysuckle (Lonicera hispidula) – red berries for birds
NECTAR PRODUCERS
- Douglas Aster (Symphyotrichum subspicatum) – late-season nectar for pollinators
- Yarrow (Achillea millefolium) – attracts many native bees
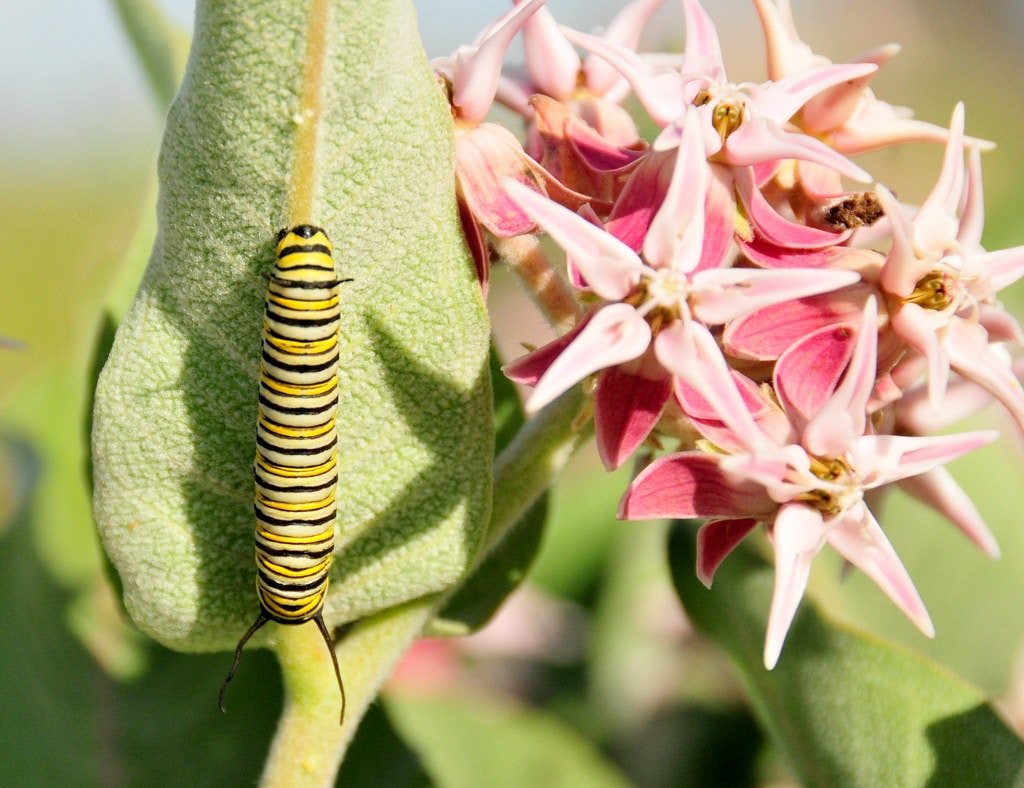
- Showy Milkweed (Asclepias speciosa) – essential for monarchs, rich in nectar
- Goldenrod (Solidago canadensis, Solidago lepida) – late-season magnet for bees
- Fireweed (Chamerion angustifolium) – popular with bees and hummingbirds
- Common Camas (Camassia quamash) – spring nectar source
- Large-flowered Phlox (Phlox maculata or P. amplifolia) – fragrant, good for butterflies
- Globe Gilia (Gilia capitata) – attracts native bees and butterflies
- Western Columbine (Aquilegia formosa) – hummingbird favorite
- Seablush (Plectritis congesta) – early bloomer for bumblebees
- Oregon Sunshine (Eriophyllum lanatum) – long-blooming bee favorite
- Red-flowering Currant (Ribes sanguineum) – very early nectar for hummingbirds
- Oceanspray (Holodiscus discolor) – fluffy, nectar-rich clusters
- Mock Orange (Philadelphus lewisii) – fragrant and heavily visited
- Blue Elderberry (Sambucus nigra ssp. cerulea) – masses of white flowers
- Nootka Rose (Rosa nutkana) – supports both nectar and pollen seekers
- Serviceberry (Amelanchier alnifolia) – blooms early for spring pollinators
- Snowberry (Symphoricarpos albus) – small but useful nectar flowers
- Western Trumpet Honeysuckle (Lonicera ciliosa) – hummingbird favorite
- Twinberry (Lonicera involucrata) – valuable for early nectar
- Coastal Strawberry (Fragaria chiloensis) – nectar and pollen for early bees
- Bigleaf Maple (Acer macrophyllum) – prolific early nectar and pollen
- Pacific Madrone (Arbutus menziesii) – flowers feed bees and hummingbirds
- Oso Berry (Indian Plum) (Oemleria cerasiformis) – first to bloom in late winter
- Chokecherry (Prunus virginiana) – fragrant spring nectar source
- Black Hawthorn (Crataegus douglasii) – many pollinator visitors
pollen producers
- Bigleaf Maple (Acer macrophyllum) – very rich in pollen, early spring bloomer
- Red Alder (Alnus rubra) – pollen-heavy catkins (wind-pollinated but bees use it)
- Oso Berry / Indian Plum (Oemleria cerasiformis) – one of the earliest blooms
- Pacific Willow (Salix lucida, S. scouleriana) – excellent early pollen and nectar
- Cascara (Frangula purshiana) – small flowers, good resource for bees
- Chokecherry (Prunus virginiana) – fragrant spring flowers rich in pollen
- Douglas Hawthorn (Crataegus douglasii) – attracts native bees and beetles
- Yarrow (Achillea millefolium) – flat flower heads are great for pollen access
- Goldenrod (Solidago canadensis, S. lepida) – late pollen source
- Common Camas (Camassia quamash) – abundant pollen in spring
- Douglas Aster (Symphyotrichum subspicatum) – long bloom period with pollen
- Oregon Sunshine (Eriophyllum lanatum) – a bee magnet
- Globe Gilia (Gilia capitata) – good pollen and nectar mix
- Lupine (Lupinus spp.) – bumblebees “buzz pollinate” to release pollen
- Clarkia (Clarkia amoena, C. purpurea) – rich in pollen, supports native solitary bees
- Phacelia (Phacelia hastata, P. linearis) – outstanding pollen and nectar plant
- Red-flowering Currant (Ribes sanguineum) – abundant pollen and nectar
- Mock Orange (Philadelphus lewisii) – highly attractive to native bees
- Nootka Rose (Rosa nutkana) – open flowers offer easy pollen access
- Oceanspray (Holodiscus discolor) – supports diverse bee species
- Blue Elderberry (Sambucus nigra ssp. cerulea) – compound blooms with lots of pollen
- Snowberry (Symphoricarpos albus) – underrated pollinator shrub
- Coastal Strawberry (Fragaria chiloensis) – early spring pollen
- Western Honeysuckle (Lonicera ciliosa) – supports long-tongued bees and hummingbirds
plant powerhouses: species that provide excellent sources of fruit, pollen, and nectar

Evergreen plants stay green through the winter, providing vital shelter and food for wildlife - and excellent landscape value for your garden!
evergreen trees
- Douglas-fir (Pseudotsuga menziesii) – Iconic conifer; prefers well-drained soils
- Western Redcedar (Thuja plicata) – Moist habitats; valuable for wildlife shelter
- Western Hemlock (Tsuga heterophylla) – Tolerates shade; soft foliage
- Grand Fir (Abies grandis) – Sweet scent; adaptable to various zones
- Shore Pine (Pinus contorta var. contorta) – Great for sandy or coastal sites
- Pacific Yew (Taxus brevifolia) – Understory tree; slow-growing
evergreen shrubs
- Salal (Gaultheria shallon) – Dense, shade-tolerant; edible berries
- Evergreen Huckleberry (Vaccinium ovatum) – Coastal to woodland plant; berries attract wildlife
- Tall Oregon Grape (Mahonia aquifolium) – State flower; yellow flowers, blue berries
- Creeping Oregon Grape (Mahonia repens) – Lower-growing; good for dry or rocky areas
- Pacific Rhododendron (Rhododendron macrophyllum) – Large, showy flowers; prefers acidic soil
- Red Huckleberry (Vaccinium parvifolium) – Partially evergreen in mild winters; supports birds and bee
evergreen groundcovers
- Kinnikinnick (Arctostaphylos uva-ursi) – Excellent for dry slopes and erosion control
- Bearberry Manzanita (Arctostaphylos columbiana) – Woody groundcover with year-round interest
- Coastal Strawberry (Fragaria chiloensis) – Spreads by runners; supports pollinators and wildlife
- Twinflower (Linnaea borealis) – Semi-evergreen; delicate groundcover for forest understory
evergreen grasses, sedges, and vines
- Roemer’s Fescue (Festuca roemeri) – Drought-tolerant bunchgrass
- California Fescue (Festuca californica) – Shade-tolerant with soft, flowing texture
- Native Sedges (Carex spp.) – Many species are evergreen in mild climates
- Hairy Honeysuckle (Lonicera hispidula) – Semi-evergreen in milder regions; hummingbird-friendly
- Western Trumpet Honeysuckle (Lonicera ciliosa) – May retain leaves in coastal or mild winters; bright orange flowers attract hummingbirds
Both of these plant types are important parts of any native habitat.
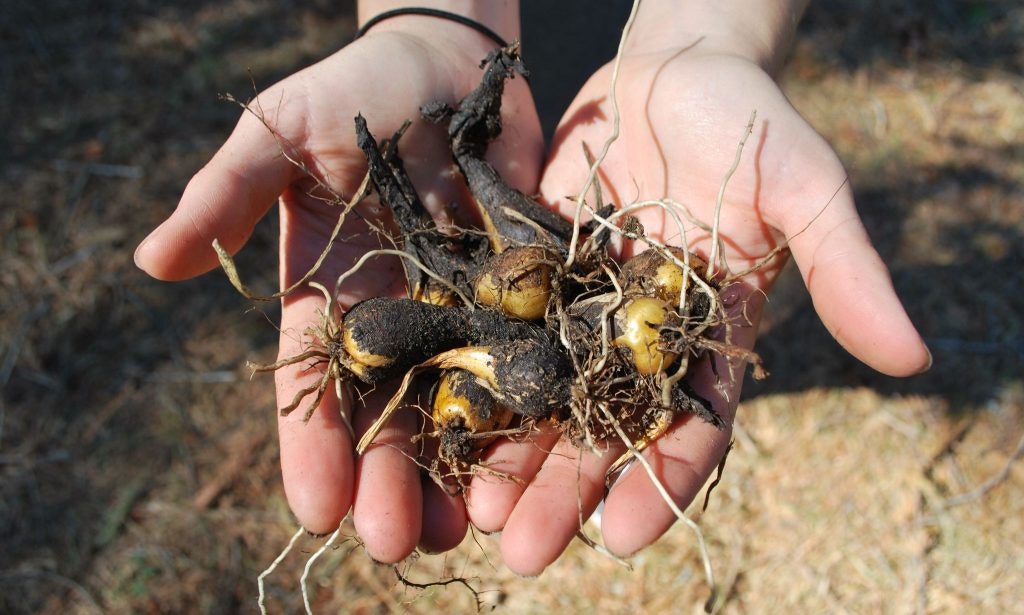
bulbs
Many native bulbs bloom very early or in distinct seasonal windows, offering nectar and pollen when few other plants are flowering. Some native bulbs have co-evolved with specific insects. Bulbs provide important food sources for browsing animals like deer, voles, and bears. Many bulbs have relationships with mycorrhizal fungi, which improve soil structure, water retention, and nutrient cycling. Their underground parts help stabilize soil, especially in meadows and seasonal wet areas.
- Common Camas (Camassia quamash) – Blue star-shaped flowers; important food source for people and wildlife
- Great Camas (Camassia leichtlinii) – Larger flowers; moist to seasonally wet meadows
- Checker Lily / Chocolate Lily (Fritillaria affinis) – Nodding, mottled brown flowers; blooms in moist meadows and woodlands
- Triplet Lily (Triteleia hyacinthina) – Delicate white to pale lilac flowers in spring and early summer
- Forktooth Ookow (Dichelostemma congestum) – Purple-blue clusters of tubular flowers; sunny open sites
- Oregon Fawn Lily (Erythronium oregonum) – Elegant white flowers with mottled leaves; early spring bloomer
- Western Trillium (Trillium ovatum) – Iconic three-petal flower; thrives in shady woodland understories
- Harvest Brodiaea (Brodiaea coronaria) – Violet flowers; prefers dry, open habitats
- Elegant Brodiaea (Brodiaea elegans) – Showy purple flowers with narrow petals; late spring bloomer
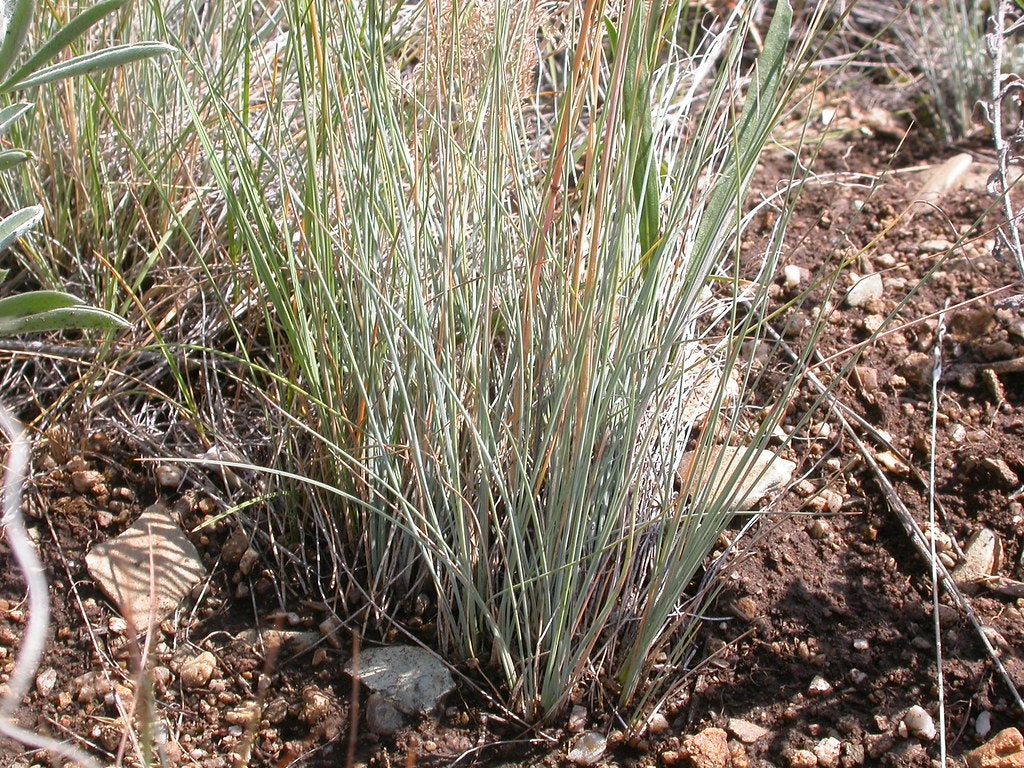
grasses
While slogans such as "kill your lawn" promoting less turf grass have gained popularity, native grasses are vital for wildlife. Native grasses have deep, fibrous root systems that hold soil in place, reducing erosion on slopes, streambanks, and open fields. These roots build organic matter and improve soil structure, increasing water retention and resilience to drought. Their long-lived root systems store carbon deep in the soil, helping to mitigate climate change by pulling CO₂ from the atmosphere. They provide nesting material and cover for birds, host larval insects, and shade out invasive weeds.
- Roemer’s Fescue (Festuca roemeri) – drought-tolerant bunchgrass, good for prairies and restoration
- California Oatgrass (Danthonia californica) – adaptable to a wide range of sites
- Blue Wildrye (Elymus glaucus) – tall and fast-growing; great for erosion control
- Slender Hairgrass (Deschampsia elongata) – delicate texture, moist woodland edges
- Tufted Hairgrass (Deschampsia cespitosa) – common in wetlands and meadows
- Idaho Fescue (Festuca idahoensis) – great for sunny, dry meadows
- Meadow Barley (Hordeum brachyantherum) – thrives in seasonal wet areas

Oregon is home to native plants that bloom every month of the year. By carefully selecting plants that bloom during different seasons, you can provide more stable and reliable food sources for wildlife.
Spring Bloomers
- Oregon Fawn Lily (Erythronium oregonum)
- Common Camas (Camassia quamash)
- Red-flowering Currant (Ribes sanguineum)
- Western Trillium (Trillium ovatum)
- Serviceberry (Amelanchier alnifolia)
- Oso Berry / Indian Plum (Oemleria cerasiformis)
- Douglas Aster (Symphyotrichum subspicatum) – starts late spring
- Showy Milkweed (Asclepias speciosa)
- Chocolate Lily (Fritillaria affinis)
- Twinflower (Linnaea borealis)
Summer Bloomers
- Blue Elderberry (Sambucus nigra ssp. cerulea)
- Pacific Rhododendron (Rhododendron macrophyllum)
- Oregon Sunshine (Eriophyllum lanatum)
- Douglas Aster (Symphyotrichum subspicatum) – continues into summer
- Goldenrod (Solidago canadensis, S. lepida)
- Western Columbine (Aquilegia formosa)
- Globe Gilia (Gilia capitata)
- Bearberry Manzanita (Arctostaphylos columbiana)
- Pacific Crabapple (Malus fusca)
- Red Huckleberry (Vaccinium parvifolium)
Fall Bloomers
- Goldenrod (Solidago canadensis, S. lepida) – peaks in fall
- Douglas Aster (Symphyotrichum subspicatum)
- Snowberry (Symphoricarpos albus)
- Oregon Grape (Mahonia aquifolium) – late bloomers possible
- Western Heather (Cassiope mertensiana) – high elevation
- Blue Wildrye (Elymus glaucus) – flowers mostly wind-pollinated
Winter Bloomers
- Oso Berry / Indian Plum (Oemleria cerasiformis) – very early, late winter to early spring
- Red-flowering Currant (Ribes sanguineum) – can start blooming late winter in mild areas
- Pacific Madrone (Arbutus menziesii) – flowers late winter/early spring
- Western Redcedar (Thuja plicata) – cones and pollen in winter (wind-pollinated)
- Douglas-fir (Pseudotsuga menziesii) – pollen cones in winter
CONTINUOUS BLOOMS CALENDAR


An important part of building a resilient habitat is including some drought-resistant species. These plants are especially well adapted to our dry summers, making them better able to withstand heat waves and climate change. None of these species need irrigation after their first summer, except in very hot weather.
drought-tolerant TREEs and large shrubs
- Oregon White Oak (Quercus garryana)
- Pacific Madrone (Arbutus menziesii)
- Ponderosa Pine (Pinus ponderosa) - look for the Willamette Valley variety!
- Manzanita (Arctostaphylos spp.) – various species ranging from large to small
- Blueblossom (Ceanothus thrysiflorus)
- Incense Cedar (Calocedrus decurrens)
- Douglas Fir (Pseudotsuga menziesii)
- Cascara (Rhamnus purshiana)
- Black Hawthorn (Crateagus douglasii)
- Red Flowering Currant (Ribes sanguineum)
- Mock Orange (Philadelphus lewisii)
- Oceanspray (Holodiscus discolor)
- Nootka Rose (Rosa nutkana)
DROUGHT-TOLERANT SMALL SHRUBS
- Oregon Grape (Tall) (Mahonia aquifolium)
- Oregon Grape (Creeping) (Mahonia repens)
- Kinnikinnick (Arctostaphylos uva-ursi)
- Salal (Gaultheria shallon)
- Snowbrush (Ceanothus velutinus)
- Buckbrush (Ceanothus cuneatus)
- Coyote bush (Baccharis pilularis)
- Snowberry (Symphoricarpos albus)
- Wax Myrtle (Myrica california)
DROUGHT-TOLERANT PERENNIALS, GRASSES, AND GROUNDCOVERS
- Oregon Sunshine (Eriophyllum lanatum)
- Roemer’s Fescue (Festuca roemeri)
- California Fescue (Festuca californica)
- Blue-eyed Grass (Sisyrinchium bellum)
- Yarrow (Achillea millefolium)
- Native lupines (Lupinus spp.)
- Camas (Camassia quamash and Camassia leichtlinii)
- Checker Lily (Fritillaria affinis)
- Blue-eyed Mary (Collinsia grandiflora)
- Kinnikinnick (Arctostaphylos uva-ursi)
- Bearberry Manzanita (Arctostaphylos columbiana)
- Coastal Strawberry (Fragaria chiloensis)
- Sword Fern (Polystichum munitum)
- Broadleaf Stonecrop (Sedum spathulifolium)
- Oregon Stonescrop (Sedum oreganum)
- Pearly Everlasting (Anaphalis emarginata)
- Douglas Aster (Symphyrotrichum subspicatum)
- Goldenrod (Solidago canadensis)
- Oregon Iris (Iris tenax)
Did you know that a single pair of chickadees needs between 6,000 and 9,000 caterpillars to raise their chicks? Caterpillars are a primary food and protein source for hundreds of animals, especially birds. Plus, if not eaten, they'll turn into beautiful butterflies or moths!
Support the entire food web by planting these caterpillar host plants:
Trees and Shrubs
- Oregon White Oak (Quercus garryana) – Hosts dozens of moth and butterfly species, including Oak Hairstreak and Spring Azure.
- Bigleaf Maple (Acer macrophyllum) – Supports species like the Green Hairstreak and various moth larvae.
- Red Alder (Alnus rubra) – Important for many moth caterpillars.
- Willows (Salix spp.) – Host to many butterfly species, including Viceroy and Northern Checkerspot.
- Ocean Spray (Holodiscus discolor) – Supports larvae of several moth species.
- Serviceberry (Amelanchier alnifolia) – Used by caterpillars of hairstreak butterflies.
- Oregon Ash (Fraxinus latifolia) – Host for the Ash Sphinx Moth and others.
Perennials and Wildflowers
- Common Camas (Camassia quamash) – Host for specific moth caterpillars in wet meadows.
- Riverbank Lupine (Lupinus rivularis) - Host for at least 10 species of butterflies and moths
- Showy Milkweed (Asclepias speciosa) - one of our best native hosts for the endangered Monarch Butterfly
- Twinflower (Linnaea borealis) – Larvae feed on leaves and flowers.
- Violets (Viola spp.) – Essential host for Fritillary butterfly caterpillars.
- Willowherbs (Epilobium spp.) – Host to various moth larvae.
- Western Columbine (Aquilegia formosa) – Supports some butterfly larvae.
Grasses and Sedges
- Roemer’s Fescue (Festuca roemeri) – Host for Skipper butterfly caterpillars.
- Blue Wildrye (Elymus glaucus) – Food plant for several moth species.
- Slender Hairgrass (Deschampsia elongata) – Supports various small moth larvae.
Learn more: Butterfly garden plan
The best seed mix will include species adapted to your particular site conditions, and that meet your habitat goals. See our suggestions below for some tried-and-true seed sources especially created in and for the Willamette Valley.
Willamette Wildlings - includes native individual species and mixes that are deer-resistant, late-season, pollinator-attracting, and more. Located in Creswell, OR
Steele Acres - includes individual species and mixes for woodlands, vernal pools, and pollinator meadows. They can also create custom mixes specific for your needs. Located in Philomath, OR
SymbiOp - native species, mixes, and starter packs curated for woodlands, rain gardens, meadows, and oak habitats. Located in Portland, OR
Decker Road Seeds - flowering lawn seeds and native perennial mixes. Located in Philomath, OR
Pro Time Lawn Seed - not all mixes contain native species, so shop thoughtfully, but their mixes have been widely used successfully for many years. Check out the eco-lawn and meadow mixes. Located in Portland, OR

Protect Soil
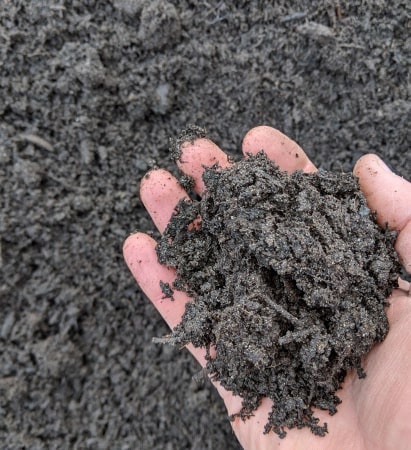
Compost is like a superfood for your garden soil — it’s decomposed organic matter that boosts soil health and plant growth in many important ways. Here’s why compost is so valuable:
- Improves Soil Structure: Compost helps sandy soils hold moisture and clay soils drain better by improving the soil’s texture and porosity.
- Adds Nutrients: It’s a rich source of essential nutrients (nitrogen, phosphorus, potassium, and trace minerals) in a slow-release form that plants can easily absorb.
- Feeds Soil Microbes: Compost nurtures beneficial bacteria, fungi, and earthworms that break down organic matter and help plants access nutrients.
- Increases Water Retention: Soils amended with compost retain water better, reducing the need for frequent watering.
- Suppresses Plant Diseases: Healthy soil microbiomes supported by compost can help protect plants from pathogens and pests.
- Reduces Waste: Composting recycles kitchen scraps and yard waste, cutting down on landfill garbage and methane emissions.
Compost can be used as a soil amendment, mulch, potting mix ingredient, a top-dressing for lawns, or for seed starting. You can also make a "compost tea" by steeping compost in water, creating a liquid fertilizer that can be sprayed on leaves or soil.
Types of composting
Traditional (Hot) Composting
- Method: Pile or bin method where organic materials (greens and browns) are layered and turned regularly to maintain high temperatures (130–160°F) to speed decomposition.
-
Pros:
- Fast breakdown (weeks to months)
- Kills most weed seeds and pathogens due to heat
- Produces nutrient-rich, stable compost
-
Cons:
- Requires space and regular turning (labor-intensive)
- Needs balance of greens (nitrogen) and browns (carbon)
- Can attract pests if not managed properly
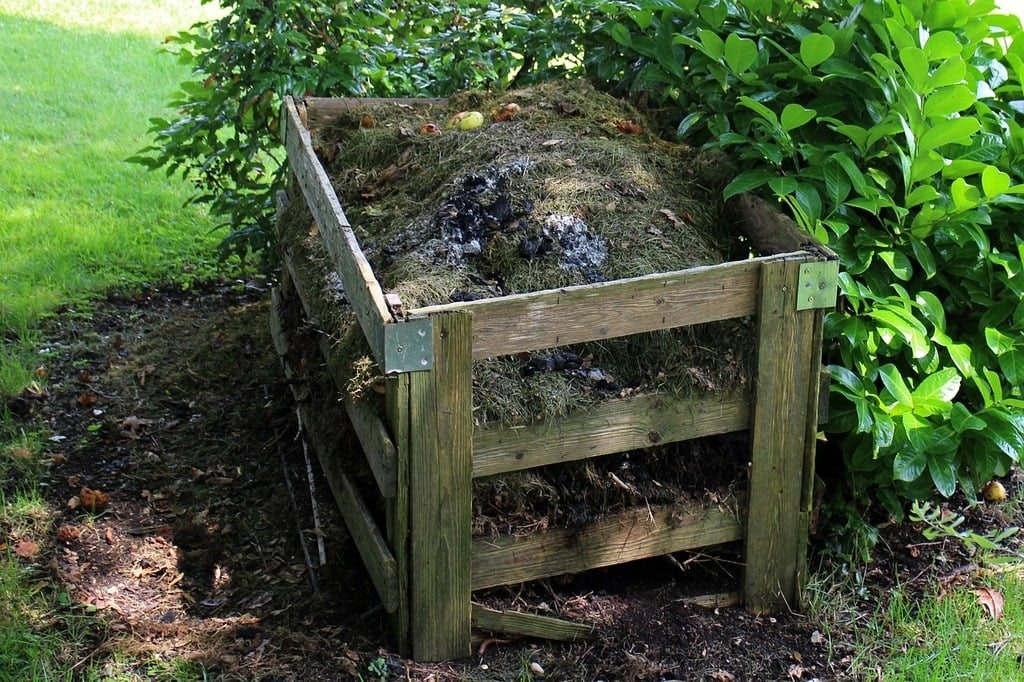
Cold Composting
- Method: Simply piling organic materials and letting them decompose slowly over many months or even a year without turning.
-
Pros:
- Low maintenance, easy for beginners
- No need for frequent turning or monitoring
- Can handle larger amounts of yard waste gradually
-
Cons:
- Takes much longer (6–12 months or more)
- Less heat means weed seeds and pathogens may survive
- Final compost can be less uniform
Trench Composting
- Method: Digging a trench or hole in the garden, filling it with organic waste, then covering it with soil to decompose in place.
-
Pros:
- No need for turning or special containers
- Adds nutrients directly to planting areas
- No visible compost pile, neat and low maintenance
-
Cons:
- Slow process; waste decomposes underground over months
- Not practical for large volumes of material
- Can attract burrowing animals if uncovered
Compost Tumblers
- Method: Rotating drum or barrel that allows easy turning and aeration of compost materials.
-
Pros:
- Easier turning reduces labor
- Faster composting due to better aeration
- Neat and contained, good for small yards
-
Cons:
- Limited volume capacity
- Can dry out or get too wet if not managed carefully
- Usually more expensive initial investment
Creating your own compost bin doesn't have to be difficult or expensive! For more home composting ideas and guidance, check out this EPA page.
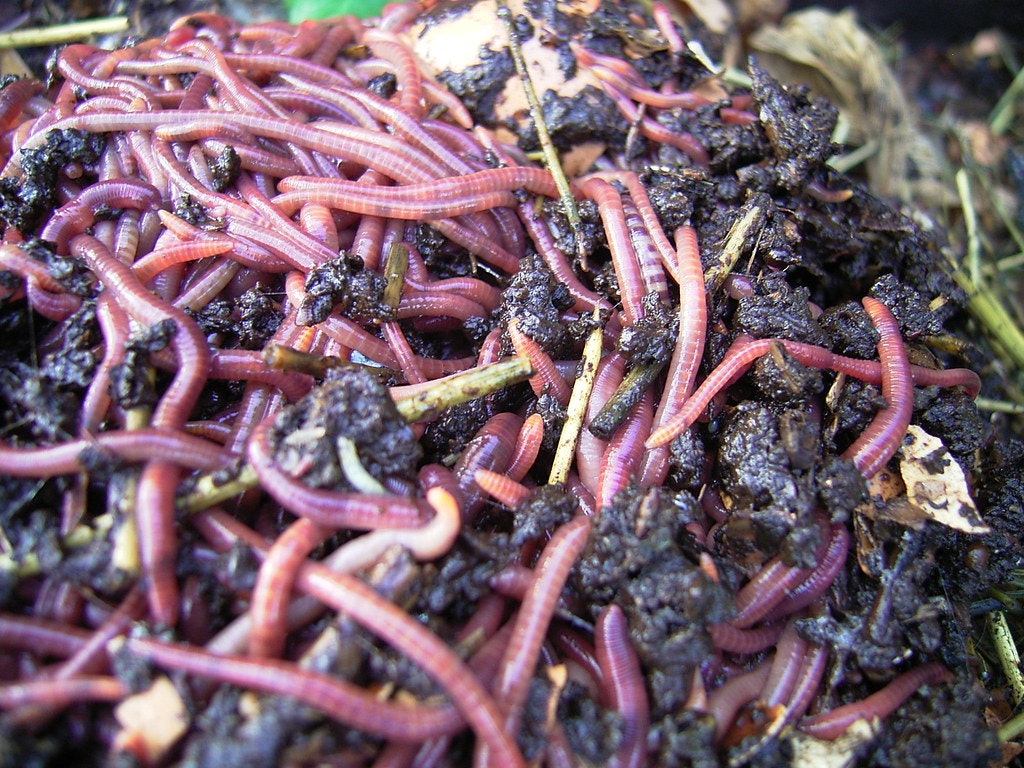
Vermiculture is the process of raising earthworms, primarily for use in vermicomposting, a method of composting organic waste using worms. It can also refer to the broader practice of worm farming for various purposes like bait or research.
There are tons of great reasons to raise worms at home:
- Produce nutrient-rich worm castings that greatly improve soil fertility and plant growth.
- Recycle kitchen scraps and organic waste efficiently, reducing landfill contributions.
- Speed up decomposition compared to traditional composting in small spaces.
- Suitable for indoor or small-space gardening, including apartments or urban settings.
- Minimal odor and pests when properly maintained.
- Encourages sustainable living and waste reduction habits.
- Worm tea (liquid castings) can be harvested as a natural fertilizer spray.
how to create a vermiculture bin
1. Choose a Container:
- Use a plastic or wooden bin with a lid (size varies by waste amount, 8–20 gallons common).
- Drill small air holes on sides and lid for ventilation.
- Optional: Place the bin on legs or trays to collect worm tea runoff.
2. Prepare Bedding:
- Use moist shredded newspaper, cardboard, coconut coir, or aged compost.
- Bedding should be damp but not soaking wet, and fluffy for air circulation.
3. Add Worms:
- Use red wigglers (Eisenia fetida) — the best species for composting.
- Starter population depends on waste amount, roughly 1 pound of worms per square foot of bin area.
4. Add Food Waste:
- Feed worms kitchen scraps: fruit and vegetable peels, coffee grounds, crushed eggshells.
- Avoid meat, dairy, oily foods, and acidic foods (e.g., citrus) in large amounts.
- Add food in small amounts regularly, burying it in bedding to reduce odors.
5. Maintain the System:
- Keep the bin in a cool, shaded place (55–77°F ideal).
- Monitor moisture; add water if too dry or dry bedding if too wet.
- Turn bedding gently if it becomes compacted.
- Harvest worm castings every few months by moving worms aside or using a migration method.
6. Harvest and Use:
- Separate worms from finished compost.
- Use worm castings as soil amendment or potting mix ingredient.
- Dilute worm tea for foliar feeding or soil drench.
Learn more: Rodale Institute vermiculture page
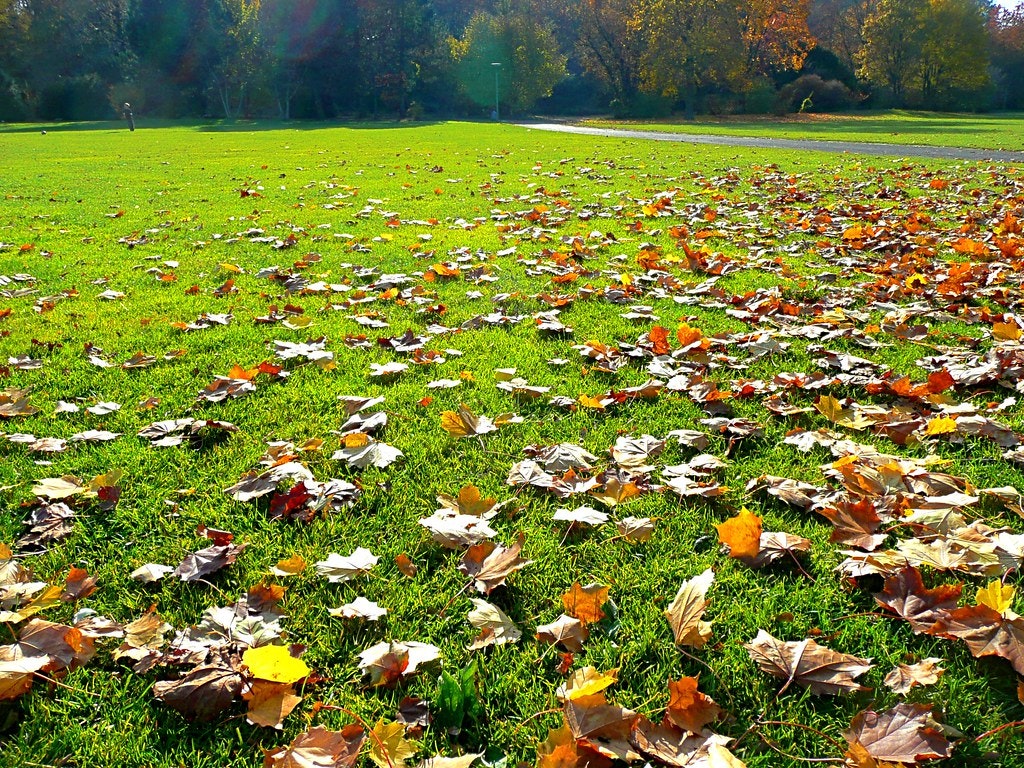
A super-simple way to support wildlife and soil health at home is to simply leave fallen leaves and smaller branches where they fall. Less work for you + better habitat for wildlife = win-win!
Here are some benefits of leaving fallen leaves on the ground:
-
Builds Healthy Soil:
Fallen leaves naturally decompose and add organic matter, improving soil structure, aeration, and water retention. -
Provides Nutrients:
As leaves break down, they release essential nutrients like nitrogen, phosphorus, and potassium back into the soil, feeding plants naturally. -
Supports Soil Microorganisms & Invertebrates:
Leaves provide habitat and food for beneficial microbes, fungi, earthworms, and insects that drive nutrient cycling and keep soil alive. -
Creates Natural Mulch:
Leaves form a protective mulch layer that conserves soil moisture, reduces erosion, and suppresses weeds. -
Offers Habitat for Wildlife:
Leaf litter shelters many small animals, including native pollinators, amphibians, beneficial insects, and overwintering butterflies or moths. -
Reduces Yard Waste:
Leaving leaves where they fall cuts down on waste sent to landfills and reduces the need for bagging and hauling leaves away. -
Improves Garden Resilience:
Mulched leaves moderate soil temperature, keeping roots cooler in summer and warmer in winter. -
Supports Native Plant Communities:
Many native plants evolved with seasonal leaf litter, which helps maintain natural nutrient cycles and forest floor ecosystems.
"But won't the leaves smother my grass or other plants?"
In most cases, fallen leaves distributed evenly across the landscape aren't a problem, but this can be a concern where leaves ccumulate in thick layers. If you're worried about leaves damaging your lawn or garden, simply rake them out of their piles and into a thinner, wider layer. Or, you can collect your leaves and use them as mulch around your plants. This natural mulch helps suppress weeds, retains soil moisture, and keeps plants cozy through the winter!
Learn more: A Nature-Friendly Case for Leaving Your Leaves
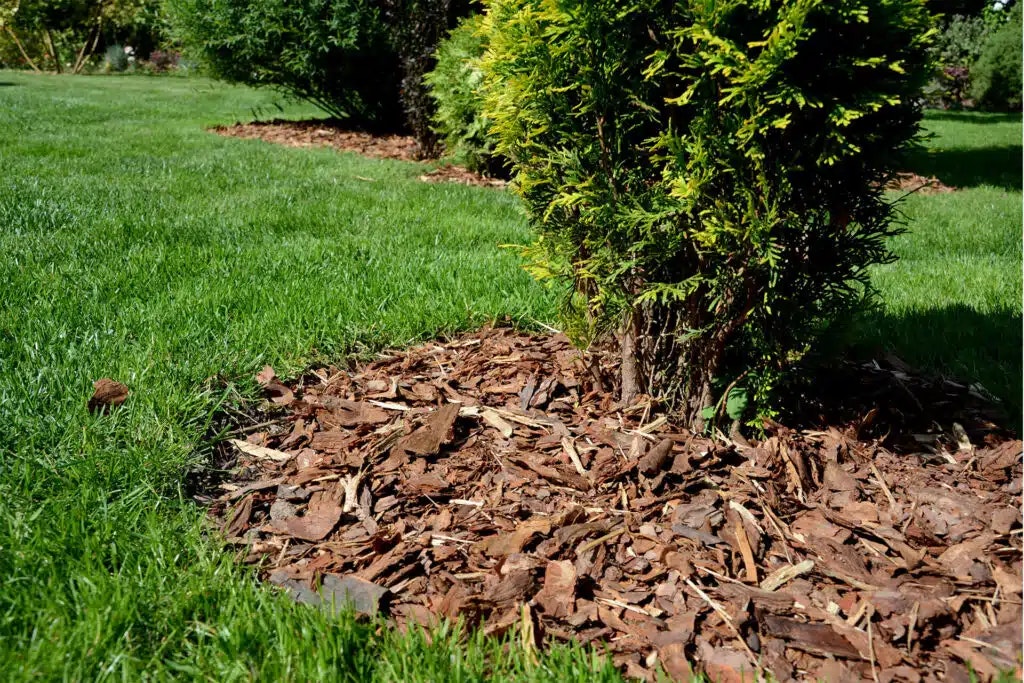
Mulch is a great way to add interest and suppress weeds in any garden! Here are just a few reasons to mulch:
- Moisture Conservation: Mulch reduces evaporation from soil, keeping roots hydrated longer and reducing the need for frequent watering.
- Weed Suppression: A thick layer blocks sunlight from reaching weed seeds, preventing or reducing weed growth.
- Soil Temperature Regulation: Mulch keeps soil cooler in summer and warmer in winter, protecting plant roots from extreme temperatures.
- Soil Health Improvement: As wood chips decompose, they add organic matter to the soil, improving texture, structure, and nutrient availability.
- Erosion Control: Mulch prevents soil from washing or blowing away during heavy rains or wind.
- Aesthetic Appeal: Creates a tidy, uniform look that enhances the visual appeal of garden beds.
- Supports Beneficial Organisms: Mulch provides habitat for earthworms, fungi, and beneficial insects that improve soil fertility and plant health.
There are lots of types of mulch beyond wood chips. These can include compost, tree bark, straw, leaves, or other plant matter.
Methods for applying wood chips or mulch:
Choose the Right Material:
- Use aged or composted wood chips if possible; fresh chips can temporarily tie up nitrogen in the soil.
- Avoid chips from allelopathic trees like black walnut or eucalyptus.
Prepare the Soil:
- Remove weeds before applying mulch.
- Water plants and soil thoroughly to ensure moisture beneath the mulch.
Apply the Mulch:
- Spread a 2 to 4-inch layer of wood chips or mulch around plants, keeping mulch a few inches away from plant stems and trunks to prevent rot and pest issues.
- Extend mulch out to cover the root zone or drip line when possible.
Maintain the Mulch Layer:
- Replenish mulch annually or as it decomposes to maintain effective depth.
- Lightly fluff or turn mulch if it becomes compacted.
Use Mulch as Pathways or Groundcover:
- Spread wood chips on garden paths or between planting rows to reduce weeds and mud.
Learn more: Pros and Cons of 8 Types of Mulch
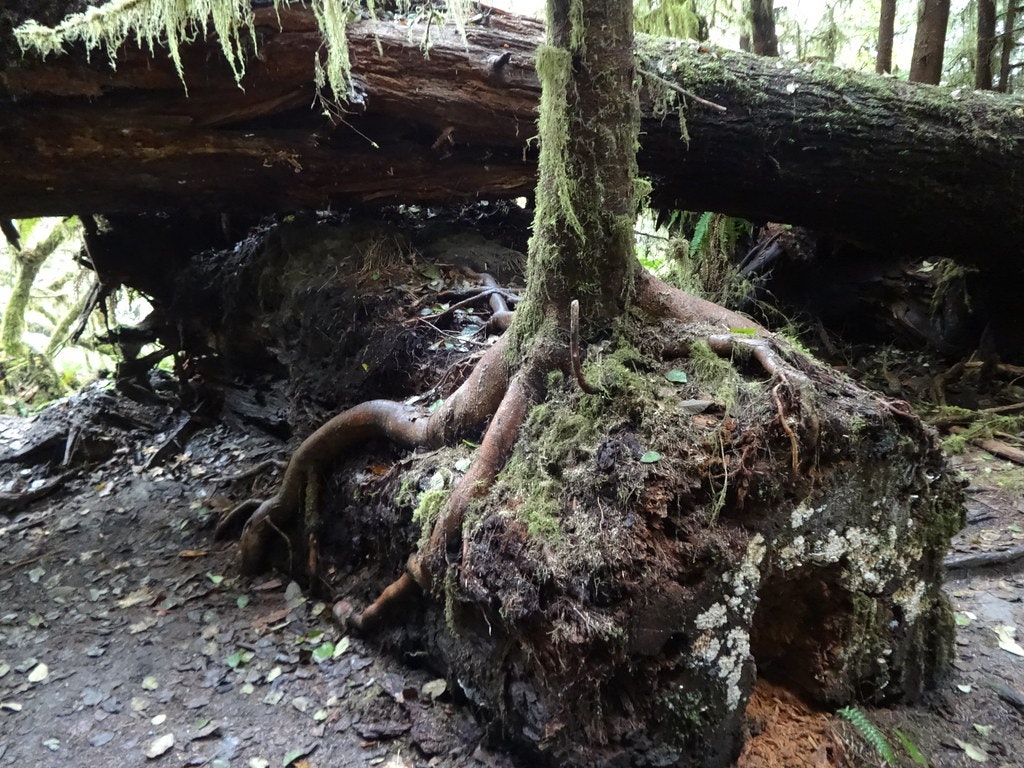
Believe it or not, that fallen branch that seems like an eyesore to you is prime real estate for MILLIONS of organisms!
In a forest, a fallen log is often called a "nurse log" because it provides nutrients, moisture, and shelter for new seedlings and other plants, acting as a nursery for forest regeneration. The decomposing material is also host to a staggering diversity of life, including:
🌿Plants and Fungi
- Mosses – Thrive on the moist, shady surfaces of decaying wood.
- Liverworts – Often found in wetter, cooler forest microclimates.
- Ferns – Such as Licorice Fern (Polypodium glycyrrhiza) and Sword Fern (Polystichum munitum).
- Seedlings of trees – Western hemlock, Douglas-fir, Sitka spruce, and others germinate in the decaying wood.
- Lichens – Symbiotic organisms made of fungi and algae or cyanobacteria, often colonize nurse log surfaces.
- Fungi (mushrooms) – Including decomposers like Turkey Tail, Artist’s Conk, Amadou, and various mycorrhizal fungi.
🐛 Invertebrates
- Beetles – Including bark beetles, wood-boring beetles, and sap beetles.
- Termites and Carpenter Ants – Break down woody material.
- Millipedes and Centipedes – Help decompose leaf litter and wood.
- Slugs and Snails – Feed on fungi, algae, and decaying organic matter.
- Springtails and Mites – Tiny decomposers and soil dwellers in the log's humus layer.
- Spiders – Hunt insects in and around the log.
🦎 Amphibians and Reptiles
- Salamanders – Such as Ensatina and Rough-skinned Newts often use nurse logs for moisture and cover.
- Frogs and toads – Use the damp environment under and around logs.
- Garter snakes – May shelter in hollow logs or hunt invertebrates there.
🐦 Birds
- Woodpeckers – Peck into soft wood for insects or create nesting cavities.
- Wrens, chickadees, and nuthatches – Use cavities or perch on mossy logs.
- Owls and other cavity nesters – May use large hollow logs as nest or roost sites.
🐿️ Mammals
- Small mammals – Mice, voles, and shrews forage for fungi and insects in and around logs.
- Squirrels – May cache food near nurse logs or use them for cover.
- Bats – Sometimes roost in hollow logs.
- Bears and raccoons – Might tear into logs for insects or grubs.
You can create your own "nursery" by placing logs, large branches, or tree stumps in your habitat. If you don't have any of these on your property, ask your neighbors or friends if they do!
Check this out: A Walk Along A Nurse Log
Adding cover crops to empty garden beds is one of the easiest, highest-impact steps you can take to improve soil health, reduce weeds, and support your future harvests.
Why Add Cover Crops to Empty Beds?
1. Prevent soil erosion and nutrient loss
Bare soil loses nutrients to rain, wind, and sun. Cover crops act like a living blanket, keeping soil in place and protecting it from leaching.
2. Build organic matter and improve soil structure
When cover crops die or are cut down, their roots and foliage decompose, creating humus. This:
- improves drainage in clay soils
- boosts water-holding capacity in sandy soils
- increases soil fluffiness and tilth
- feeds beneficial soil organisms
3. Suppress weeds
Fast-growing cover crops (like oats or buckwheat) shade out weed seedlings. This reduces future weeding and keeps the soil seed bank from being replenished.
4. Add nitrogen naturally
Legumes—such as crimson clover, vetch, and field peas—host nitrogen-fixing bacteria that take nitrogen from the air and store it in nodules on their roots. When you chop them down, that nitrogen becomes available for next season's crops.
5. Break pest and disease cycles
Rotating in a non-crop plant gives your soil a break from pathogens that affect vegetables. Some covers, like mustards, even release natural biofumigants.
6. Support pollinators and beneficial insects
Flowering covers provide nectar early or late in the season when few other plants are blooming.
Suggest cover crops and when to plant
Fall (for overwintering):
- Crimson clover
- Hairy vetch
- Winter peas
- Winter rye
- Oats
- Annual ryegrass
Spring or Summer:
- Buckwheat (fast, great for bees)
- Millet
- Cowpeas
- Phacelia
How to Add Cover Crops (Step-by-Step)
1. Clean the bed lightly
- Pull major weeds or cut them at the base.
- You don’t need perfect cleanliness; residual plant matter is fine.
2. Loosen the soil (optional)
If soil is compacted, rake or lightly fork the top 1–2 inches to help seeds germinate. No deep tilling needed.
3. Broadcast the seeds evenly
Scatter them by hand. For tiny seeds, you can mix them with sand or vermiculite to help distribute them evenly.
4. Rake in or tamp
- Rake gently to cover seeds ¼–½ inch deep, OR
- Press them into the soil with a board, roller, or your feet for good seed-to-soil contact.
5. Water (if rain isn’t coming)
Moisture is needed for germination. After plants establish, they usually manage on seasonal rainfall.
6. Grow until the right stage
- Grow winter covers through early spring.
- For summer covers, 4–6 weeks is often enough.
7. Terminate the cover crop
When plants are 12–18 inches tall or just before they flower:
- Cut at ground level with pruners, hoe, or a string trimmer.
- Leave roots in place to feed soil life.
- Let the cut material break down on the surface as mulch.
If planting immediately after termination, wait 1–3 weeks for decomposition to mellow, especially with carbon-heavy covers like rye.
Tips for Success
- Match the cover to the season: oats die in winter (easy to manage), rye survives (more biomass).
- Use legumes to add nitrogen before heavy-feeding crops like tomatoes, corn, or squash.
- Terminate before seeds form to avoid self-seeding or difficult regrowth.
- Mix species (e.g., oats + peas + clover) for biodiversity and better soil outcomes

Conserve Water

Installing drip irrigation in your garden is one of the most water-efficient, plant-friendly ways to keep your garden healthy. Here’s a breakdown of why it’s beneficial and how to install it:
Benefits
-
Saves Water:
Delivers water directly to plant roots, reducing evaporation and runoff—can use 30–50% less water than sprinklers. -
Reduces Weeds:
Water is applied only where needed, so weed seeds in dry areas don’t germinate. -
Improves Plant Health:
Keeps foliage dry, reducing the risk of fungal diseases like mildew or blight. -
Efficient for Raised Beds and Row Crops:
Works well with vegetables, perennials, and orchard trees. -
Automatable:
Easily connects to a timer or smart controller for low-maintenance watering. -
Soil Structure Stays Intact:
Unlike overhead watering, drip doesn't compact soil or disturb mulch.
Materials You'll Need
- Backflow preventer and pressure regulator (usually included in starter kits)
- Filter (to prevent clogging)
- ½" mainline tubing
- ¼" drip tubing or emitter lines
- Barbed connectors and end caps
- Drip emitters or inline emitter tubing
- Stakes to hold tubing in place
- Optional: Timer for automated watering
installation step-by-step
1. Plan Your Layout
- Sketch your garden and mark each plant or row.
- Decide where the mainline tubing will run and where emitters or drip lines are needed.
2. Set Up at the Water Source
- Connect a backflow preventer, filter, pressure regulator, and then the mainline tubing to your outdoor faucet or spigot.
3. Lay Out the Mainline Tubing
- Run the ½" tubing along your beds or rows. Use stakes or landscape staples to keep it in place.
4. Branch Off with ¼" Tubing
- Use a hole punch to insert barbed connectors into the mainline, and run ¼" tubing to individual plants or rows.
- Attach emitters (e.g., 1 gallon/hour) at the end of the tubing, or use inline emitter tubing for evenly spaced watering.
5. Cap the Ends
- Use end caps or loop the tubing back into itself and clamp it off to close the system.
6. Test the System
- Turn on the water and check for leaks or clogged emitters. Adjust as needed.
7. Set a Timer (Optional)
- Add a battery-operated or smart timer at the spigot for consistent, hands-free watering.
Tips for Success
- Mulch over drip lines to keep soil cool and reduce evaporation.
- Flush the system occasionally to prevent mineral or algae buildup.
- Adjust seasonally based on rainfall and plant needs.
- In Oregon, even drought-tolerant plants benefit from occasional deep drip watering during long dry periods.
For a complete tutorial and product suggestions, check out Homestead And Chill
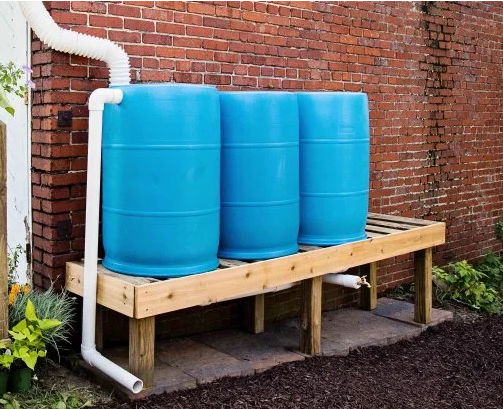
NEED TO KNOW: In Benton County, if the rainwater capturing system does not exceed 5,000 gallons, does not require plumbing or drainage inside a building or structure, and rainwater is used only for non-potable uses such as irrigation, you do not need a plumbing permit.
Rain barrels, cisterns, or other rain capture devices take advantage of our abundant winter water, saving it for use during our dry summers. Rainwater is free, reducing your dependence on municipal water and lowering your water bill. It can also be better for plants, since rainwater is "softer" and free of chemicals and salts found in treated tap water.
Learn how to install a rain barrel below!
Materials You'll Need
- Rain barrel (typically 40–80 gallons; food-grade or purpose-built)
- Downspout diverter or rainwater inlet screen
- Spigot or hose connection near bottom
- Overflow outlet (with hose or pipe)
- Level base (cinder blocks, pavers, or gravel)
- Optional: mesh screen (to block mosquitoes and debris), linking kit for multiple barrels
Installation Step-by-step
1. Choose a Location
- Find a spot under a downspout with easy access for your garden hose or watering can.
- Make sure it’s elevated and level—use blocks or bricks to raise the barrel (gravity increases water pressure).
2. Prepare the Downspout
- Cut the downspout a few inches above the top of the barrel.
- Attach a diverter kit or use a simple elbow to direct water into the barrel.
- Make sure excess water is routed away from your foundation (via overflow hose or diverter bypass).
3. Position the Barrel
- Set it on your prepared base.
- Ensure the spigot is reachable and the barrel is stable.
- Attach screens or a sealed lid to keep out mosquitoes, leaves, and animals.
4. Connect Spigot and Overflow
- Install a spigot at the bottom for easy water access.
- Connect overflow outlet to a hose or pipe leading away from structures or into a second barrel.
5. Test the System
- Run water into the gutter or simulate rain with a hose to check flow into the barrel and make sure the overflow works properly.
Tips for Using Your Rain Barrel
- Use the water for vegetable gardens (non-edible parts), flowers, trees, lawns, and potted plants. Avoid using on edible parts unless filtered or treated
- Clean the barrel annually to prevent algae buildup.
- Disconnect and drain in winter if you’re in a freeze-prone area, or install a freeze-proof diverter.

Replacing a traditional lawn with an eco-lawn or meadow offers a wide range of ecological, practical, and aesthetic benefits. Here’s a breakdown of the key reasons to make the switch:
Water Conservation
Traditional lawns require significant irrigation, especially in summer. Eco-lawns and meadows use drought-tolerant native or adapted plants that thrive on rainfall alone once established.
Reduced Maintenance
Less mowing—eco-lawns may only need 1–2 cuts per season; meadows often need just one annual mow. No need for fertilizing, aerating, or constant reseeding. Fewer weeds once the system is established due to dense, competitive plant cover.
Habitat Creation
Provides nectar, pollen, seeds, and shelter for pollinators, birds, butterflies, and beneficial insects. Supports native wildlife, including ground-nesting bees, caterpillars, and songbirds.
Soil Health AND Erosion Control
Deep-rooted plants in meadows and eco-lawns build soil structure, increase microbial life, and reduce compaction. Helps prevent erosion and improve water infiltration, reducing runoff.
Pollution Reduction
Reduces or eliminates the need for chemical fertilizers, herbicides, and pesticides. Lowers air and noise pollution from gas-powered lawn equipment.
Climate Resilience
Meadows and eco-lawns can survive heatwaves, drought, and poor soil conditions better than turfgrass. Deep roots help sequester carbon and increase landscape resilience.
Aesthetic And Educational Value
Meadows provide seasonal color, texture, and movement—far more interesting than a static green lawn. Can become a teaching tool for ecology, native plants, and pollinator conservation.
Basics of replacing your lawn
- Kill existing lawn (sheet mulch, solarize, or remove sod)
- Choose seed mix based on site conditions (sun, soil, moisture)
- Sow in fall or early spring for best results
- Water until established, then reduce irrigation
Learn more: West Multnomah SWCD's Meadowscaping Handbook
NEED TO KNOW: Under Oregon Law, all water belongs to the public. With few exceptions, anyone wishing to take and use surface water or groundwater must first obtain a permit from the Oregon Water Resources Department. Call 503-508-2394 or email our local Watermaster at joel.m.plahn@water.oregon.gov for permit help.
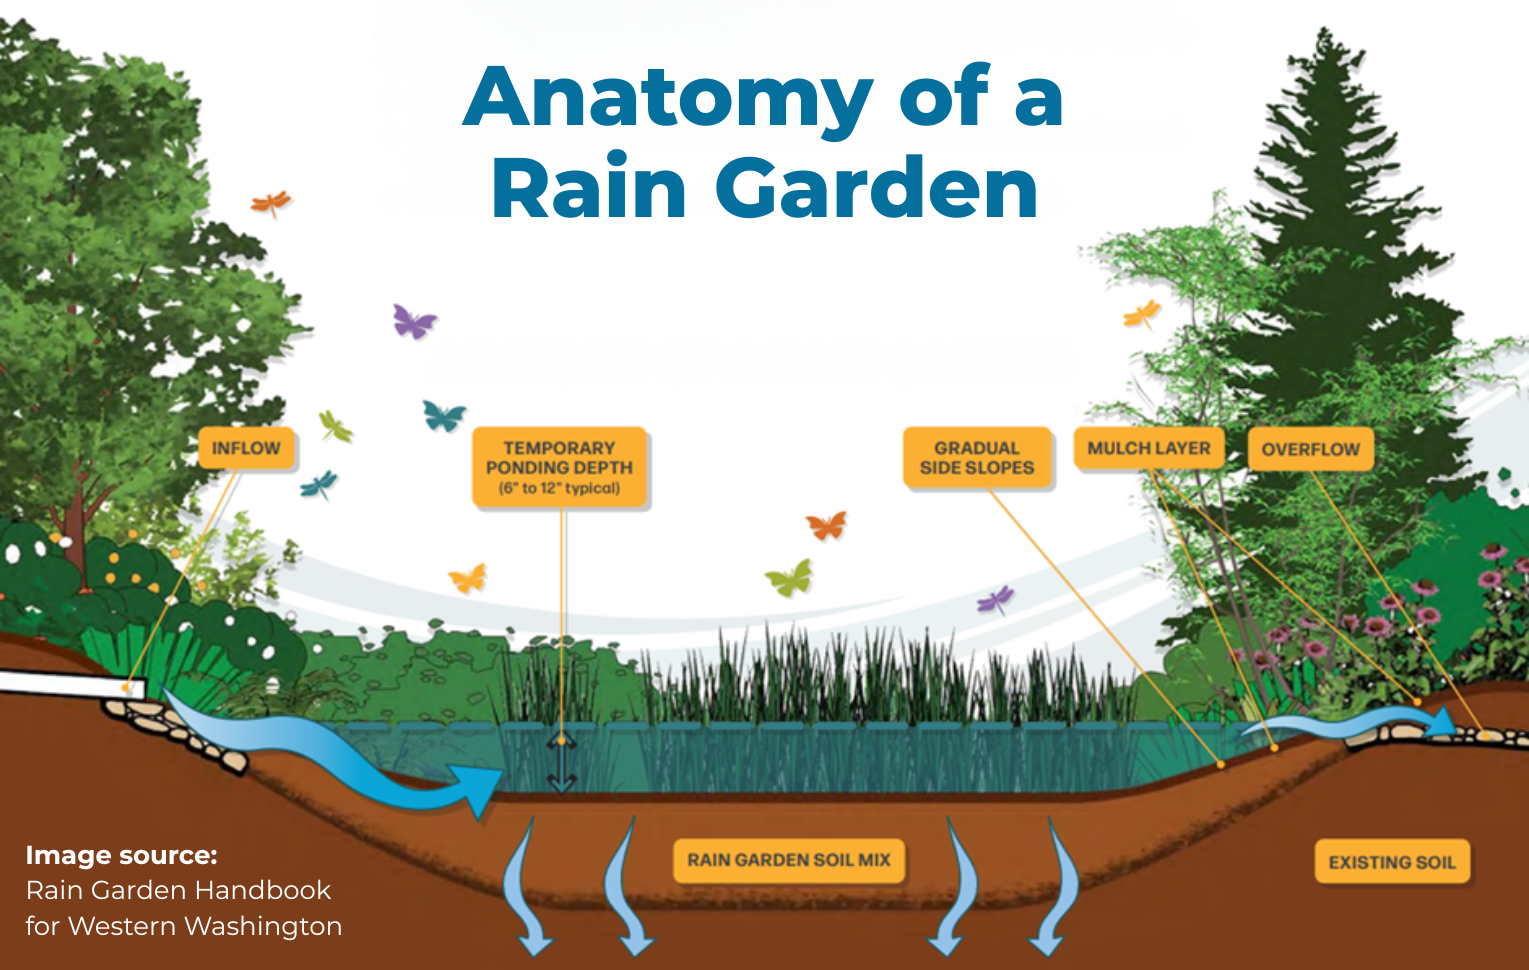
A rain garden is a shallow, landscaped depression designed to collect and absorb rainwater runoff. Essentially, it's a garden that temporarily holds rainwater, allowing it to soak into the ground instead of flooding or flowing into storm drains.
Installing a rain garden or pond offers a wide range of environmental, practical, and aesthetic benefits — especially in regions like Oregon, where managing seasonal rain is important for both flood prevention and water quality protection. Here are just some of the benefits of rain gardens, ponds, and bioswales:
Manages Stormwater Naturally
- Captures and absorbs runoff from roofs, driveways, and patios before it enters storm drains.
- Helps slow down, spread out, and soak in water during heavy rains, reducing local flooding and erosion.
Improves Water Quality
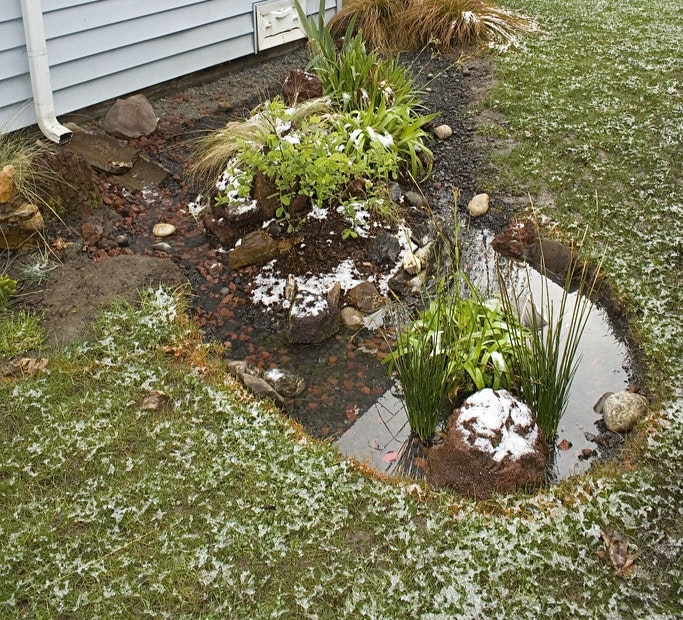
- Filters out pollutants like oil, heavy metals, fertilizers, and pet waste before they reach creeks, rivers, and groundwater.
- Acts as a natural biofilter, using soil, plants, and microbes to clean runoff.
Recharges Groundwater
- Promotes infiltration of rainwater into the soil, helping replenish underground aquifers and stabilize stream flows.
Provides Wildlife Habitat
- Supports native bees, butterflies, birds, and amphibians with diverse plantings and seasonal water.
- Adds habitat in developed areas where wildlife needs safe foraging and nesting space.
fosters Climate Resilience
- Helps buffer against droughts and extreme storms by holding water in the landscape.
- Creates cooler microclimates with vegetation that reflects and retains less heat than pavement or turf.
What about bioswales?
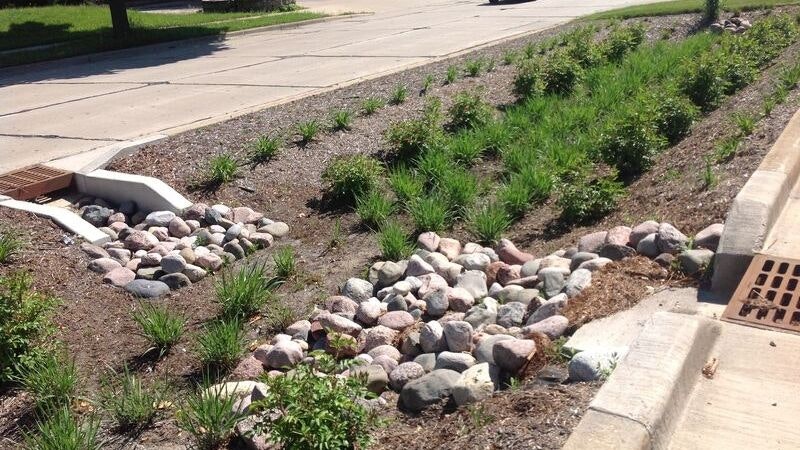
Bioswales are landscape features designed to manage stormwater naturally by capturing, filtering, and slowly infiltrating runoff into the soil. It's usually a shallow, vegetated channel—like a gently sloped ditch—containing native grasses, sedges, shrubs, and flowers that tolerate both wet and dry conditions.
Bioswales are useful in larger areas that are especially prone to flooding. Bioswales are engineered to handle stormwater runoff, especially from paved surfaces. They're often found along roads or sidewalks. Rather than a round, pond-like rain garden, bioswales tend to be linear.
Learn more:
How to Build a Rain Garden Guide (East Multnomah SWCD)
Big or Small, Ponds For All (Wild About Gardens)
Create a garden pond for wildlife (OSU Extension)

Redirecting the water from your downspouts is a simple, impactful way to reduce stormwater runoff, prevent erosion, and reroute rainwater into your landscape where it can be used or absorbed.
Downspouts are often directed onto a paved surface, such as a driveway, which sends water directly into the street when it rains. Downspouts may also be connected to a pipe in the ground that connects directly to the sanitary sewer or storm drain system. If this is the case, you can disconnect your downspout and redirect it to flow into a rain barrel or to a lawn or garden where it can soak into the ground. Redirecting downspouts to a landscaped area is a great way to help reduce runoff from a property.
If your downspout is emptying onto a paved surface or into a storm drain, here's how to redirect it:
Materials You’ll Need
- Hacksaw or reciprocating saw
- Downspout elbow (often 2" x 3" or 3" x 4")
- Extension pipe or splash block
- Downspout cap or plug (to seal original connection)
- Sheet metal screws
- Optional: rain barrel, flexible tubing, or diverter
- Gravel, mulch, or dry well if directing water into landscape
Check Local Guidelines
Some cities have rules or incentives. Make sure disconnection is allowed and done correctly to avoid causing water issues for neighbors.
Measure & Cut the Downspout
Cut the vertical downspout a few inches above where it enters the storm drain pipe or ground sleeve.
Seal the Storm Drain Pipe
Cap the old connection to prevent debris and pests from entering. Use a rubber cap or plug with a hose clamp.
Attach an Elbow Fitting
Use a metal or plastic elbow to redirect the water sideways toward your landscape. Secure with screws.
Add an Extension or Splash Block
Direct the water at least 2–3 feet away from your foundation using a rigid pipe, flexible tubing, or a splash block.
Stabilize the Area Below
Place gravel, mulch, or vegetation to prevent erosion where water flows out.
Tips for Success
- Make sure water flows away from buildings and neighboring properties.
- Aim for water to soak into a rain garden, mulch basin, or eco-lawn.
- Avoid directing water onto impervious surfaces, steep slopes, or compacted soil.
- Consider installing a rain barrel or cistern to store and use rainwater for irrigation.
Learn more: How to disconnect downspouts (YouTube)

Support Wildlife

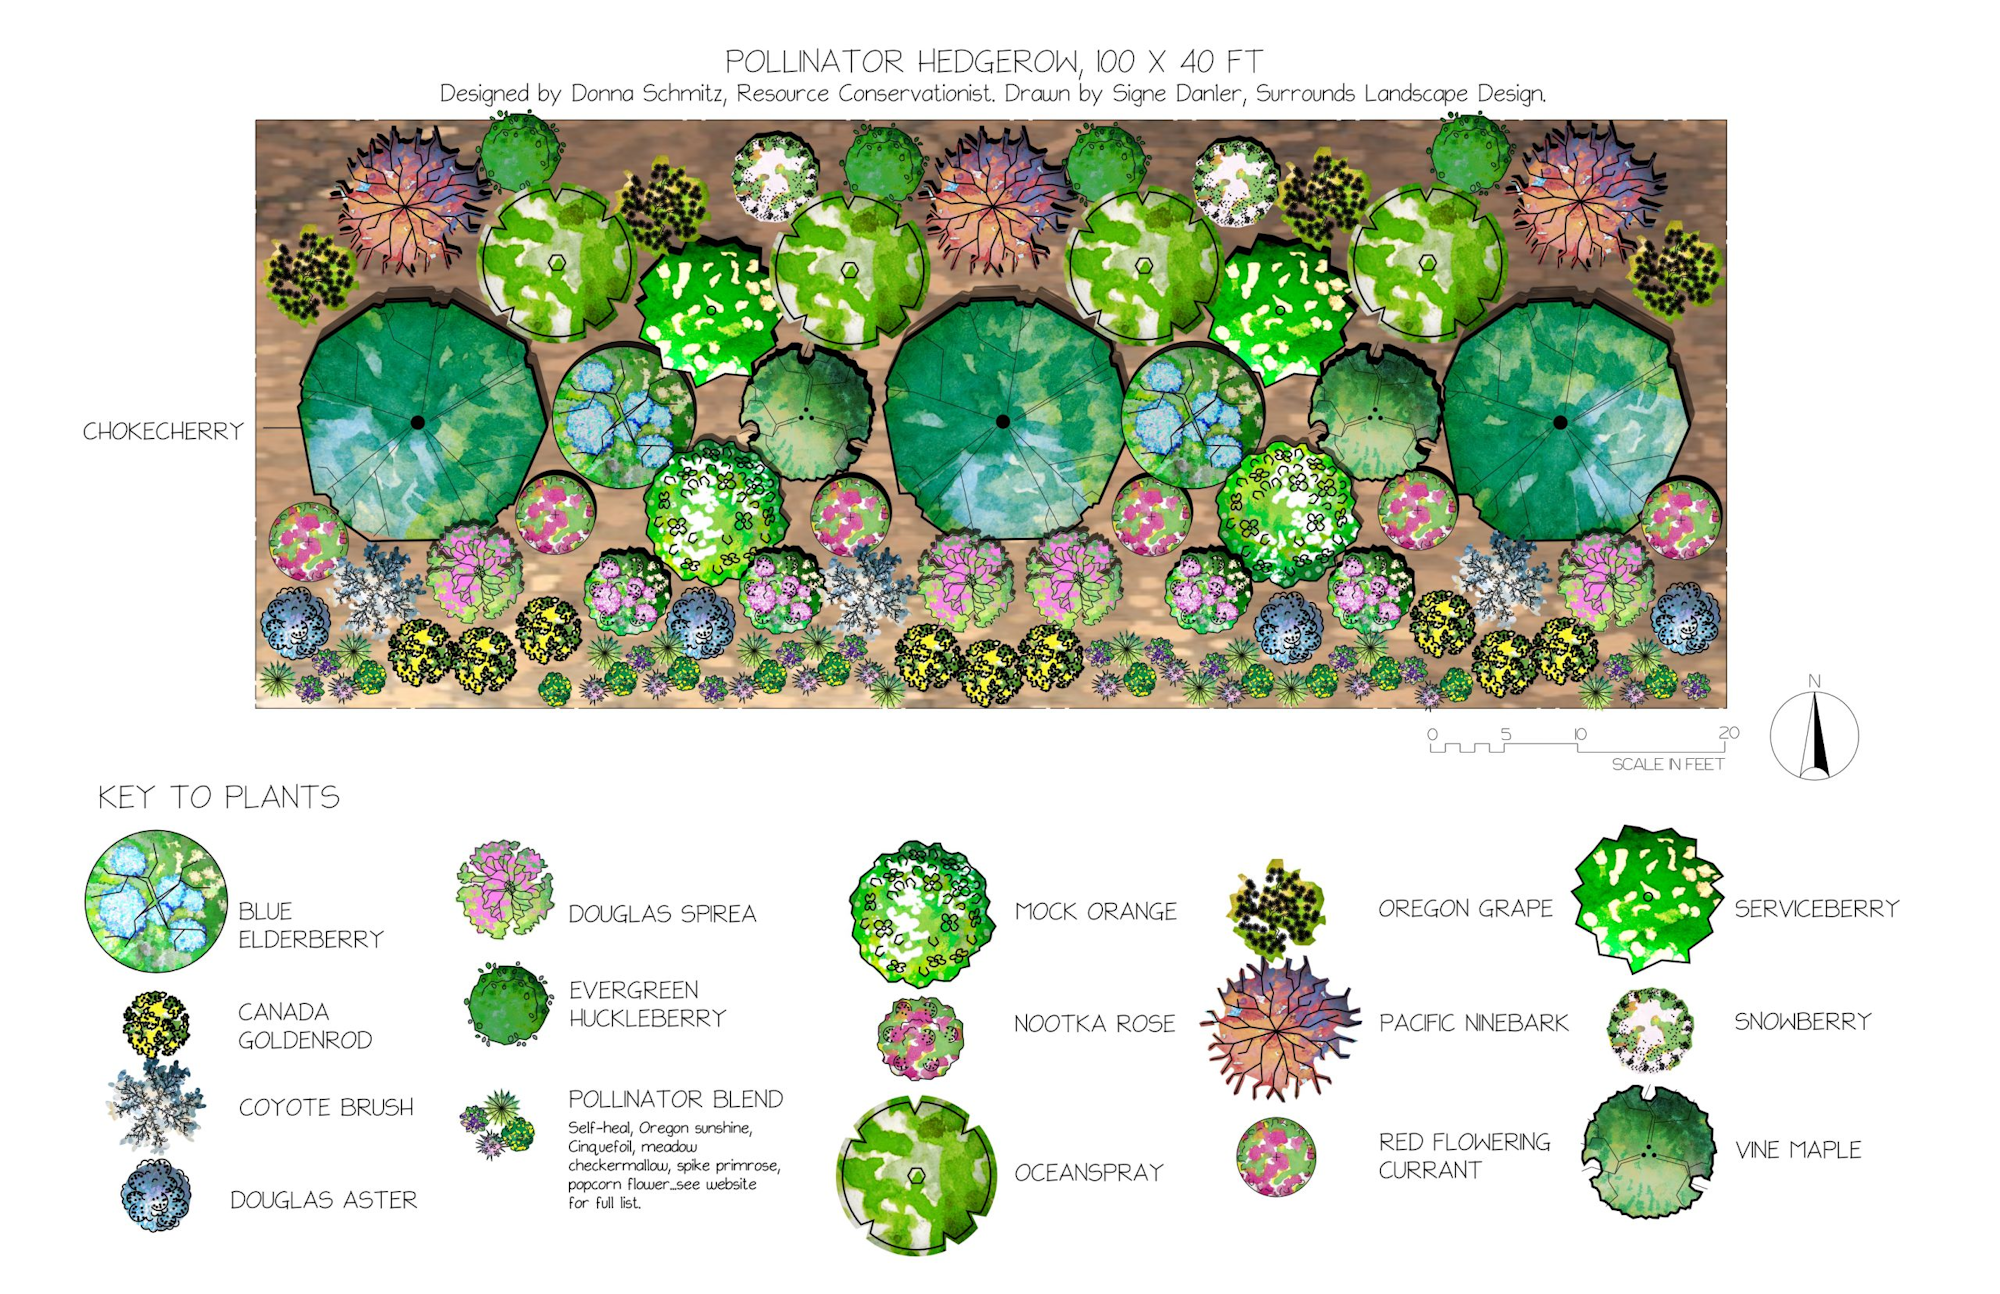
A hedgerow is a line of shrubs and/or trees planted closely together, designed to create borders or windbreaks. These hedges provide great hiding places and shelters for a variety of wildlife.
Evergreen and/or thorny hedgerows are especially useful. Year-round foliage means year-round protection from predators and weather. And thorns provide further deterrants for would-be predators.
Evergreen Shrubs for hedgerows
- Tall Oregon Grape (Mahonia aquifolium) – Evergreen and prickly, early flowers for bees, berries for birds
- Low Oregon Grape (Mahonia nervosa) – Shorter form, shade-tolerant
- Salal (Gaultheria shallon) – dense, edible berries, good for shady areas
- Coast Silk-tassel (Garrya elliptica) – large, drought-tolerant, ornamental catkins
- Buckbrush (Ceanothus cuneatus) – Dense, 3-10ft tall, drought-tolerant, deer-resistant
- Blueblossom (Ceanothus thyrsiflorus) - gets very large, pollinator magnet, drought-tolerant
thorny shrubs for hedgerows
- Nootka Rose (Rosa nutkana) – Thorny, pollinator-friendly, spreads into thickets
- Salmonberry (Rubus spectablis) – Large, soft leaves, edible fruit, excellent bird habitat
- Blackcap Raspberry (Rubus leucodermis) – Thorny, excellent fruit, dense growth
- Gooseberry (Ribes divaricatum) – Thorny, pollinator-attracting flowers, edible fruit
- Black Hawthorn (Crataegus douglasii) – Thorny, excellent wildlife habitat, fruit and flowers
other great natives for hedgerows
- Serviceberry (Amelanchier alnifolia) – Four-season beauty, edible berries, early flowers for pollinators
- Snowberry (Symphoricarpos albus) – Tolerates poor soil, winter berries for birds
- Douglas Spiraea (Spiraea douglasii) – Suckering shrub, great for wet areas, pollinator magnet
- Red Osier Dogwood (Cornus sericea) – Vibrant red stems in winter, great for wetter areas
- Pacific Ninebark (Physocarpus capitatus) – Tolerates moist soil, showy flowers and bark, good structure
- Cascara (Rhamnus purshiana) – Small tree, attracts birds with berries, fall color
- Western Crabapple (Malus fusca) – Wildlife favorite, beautiful spring flowers, small edible fruits
- Chokecherry (Prunus virginiana) – Great for pollinators, birds, and beneficial insects
- Vine Maple (Acer circinatum) – Small tree or large shrub, brilliant fall color, supports caterpillars
- Oceanspray (Holodiscus discolor) – Drought-tolerant, attractive blooms, supports pollinators
Tips for a Thriving Native Hedgerow
- Layer heights: Combine tall, medium, and low plants to mimic natural edge habitat.
- Mix evergreen and deciduous species for year-round function and beauty.
- Include nectar, fruit, seed, and shelter resources to support birds, insects, and small mammals.
- Space plants closely (2–6 ft apart) for a dense screen, or more loosely for a wilder feel.
Leaving dead plant stems in place, particularly during the winter and early spring, offers several significant benefits, especially for wildlife and the overall garden ecosystem.
Here's why you should consider leaving dead stems standing over the winter:
- Insect Habitat: Dead stems, especially hollow or pithy ones, serve as crucial overwintering sites for many beneficial insects, including solitary bees, ladybugs, and beetles. These insects take shelter inside the stems to escape the cold and safely hibernate until warmer weather arrives.
- Support for Native Bees: Many native bee species, including leafcutter bees and small carpenter bees, utilize plant stems for nesting. By leaving stems standing, you provide essential nesting opportunities for these important pollinators.
- Food Source for Wildlife: The seed heads of many plants persist through the winter and provide a valuable food source for birds, squirrels, and small mammals when other food sources are scarce.
- Protection for Plants: Leaving dead stems can help protect the plant's roots from harsh winter conditions. They can also provide a natural mulch layer, helping to insulate the soil and suppress weeds.
- Natural Decomposition: As the stems decompose, they contribute to the soil's organic matter, improving its health and fertility. This natural process reduces the need for external fertilizers.
- Structural Support: Some dried stems, when left standing, can provide a bit of support for next year's growth, helping plants that tend to flop stay more upright.
Native plants with hollow or pithy stems
Herbaceous Plants
- Yarrow (Achillea millefolium)
- Cow Parsnip (Heracleum maximum)
- Lupine (Lupinus rivularis and Lupinus polyphyllus)
- Goldenrod (Solidago canadensis and others)
- Fireweed (Chamerion angustifolium)
- Biscuitroot (Lomatium dissectum)
- Milkweed (Asclepias speciosa and Asclepias fascicularis)
- Checkermallows (Sidalcea campestris, Sidalcea malviflora, Sidalcea cusickii)
- Anise hyssop (Agastache foeniculum)
- Douglas Aster (Symphyotrichum subspicatum)
shrubs
- Elderberry (Sambucus racemosa – Red Elderberry)
- Snowberry (Symphoricarpos albus)
- Ocean Spray (Holodiscus discolor)
- Douglas spiraea (Spiraea douglasii)
- Birch-leaf spiraea (Spiraea lucida)
- Black raspberry (Rubus leucodermis)
- Thimbleberry (Rubus parviflorus)
Learn more: Nesting and Overtwintering Habitat for Beneficial Insects - Xerces Society
The best habitat for wildlife is natural features - native plants, ponds, rocks, and logs. But you can also support wildlife with handmade houses. It's important to select or build these houses with the right specifications, so read on below!
bird houses
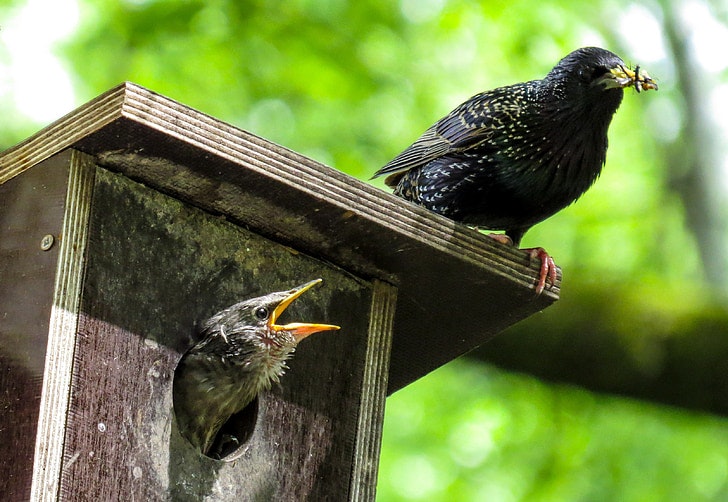
- Entrance Hole Size: The size of the entrance hole is crucial. It should be large enough for the target species to enter but small enough to deter larger, unwanted birds and predators.
- Sloped Roof: A roof that extends over the entrance and is sloped helps protect the nest from rain and sun.
- No Perch: A perch can act as an entry point for predators, so it's best to avoid having one.
- Rough Interior: Rough interior walls help fledglings climb out when they are ready to leave the nest.
- Wood choice: Untreated wood is a good choice for birdhouses as it provides insulation. Cedar, redwood, and pine are particularly good options due to their durability.
- Thick Walls: Thick walls (at least 3/4 inch) help with insulation and keeping the nest at a stable temperature.
- Drainage and ventilation holes: Drainage holes in the bottom of the birdhouse prevent water from accumulating and harming the birds or nestlings. Ventilation holes allow for airflow and prevent overheating, especially in warmer weather.
- Watertight Seams: Seams should be sealed to prevent water from leaking in.
- Predator Protection: Position the birdhouse away from areas where predators like cats, snakes, or squirrels are likely to roam.
- Easy Access: Choose a birdhouse design that allows for easy access for cleaning and monitoring, such as a hinged side panel or a lift-off roof.
- Regular Cleaning: Clean out old nests after the breeding season to prevent the buildup of parasites and ensure the birdhouse is ready for the next occupants.
Features of a Great Bird House
Cornell Lab of Ornithology: Right Bird/Right House search engine
How to build a nest box for wild birds (OSU Extension)
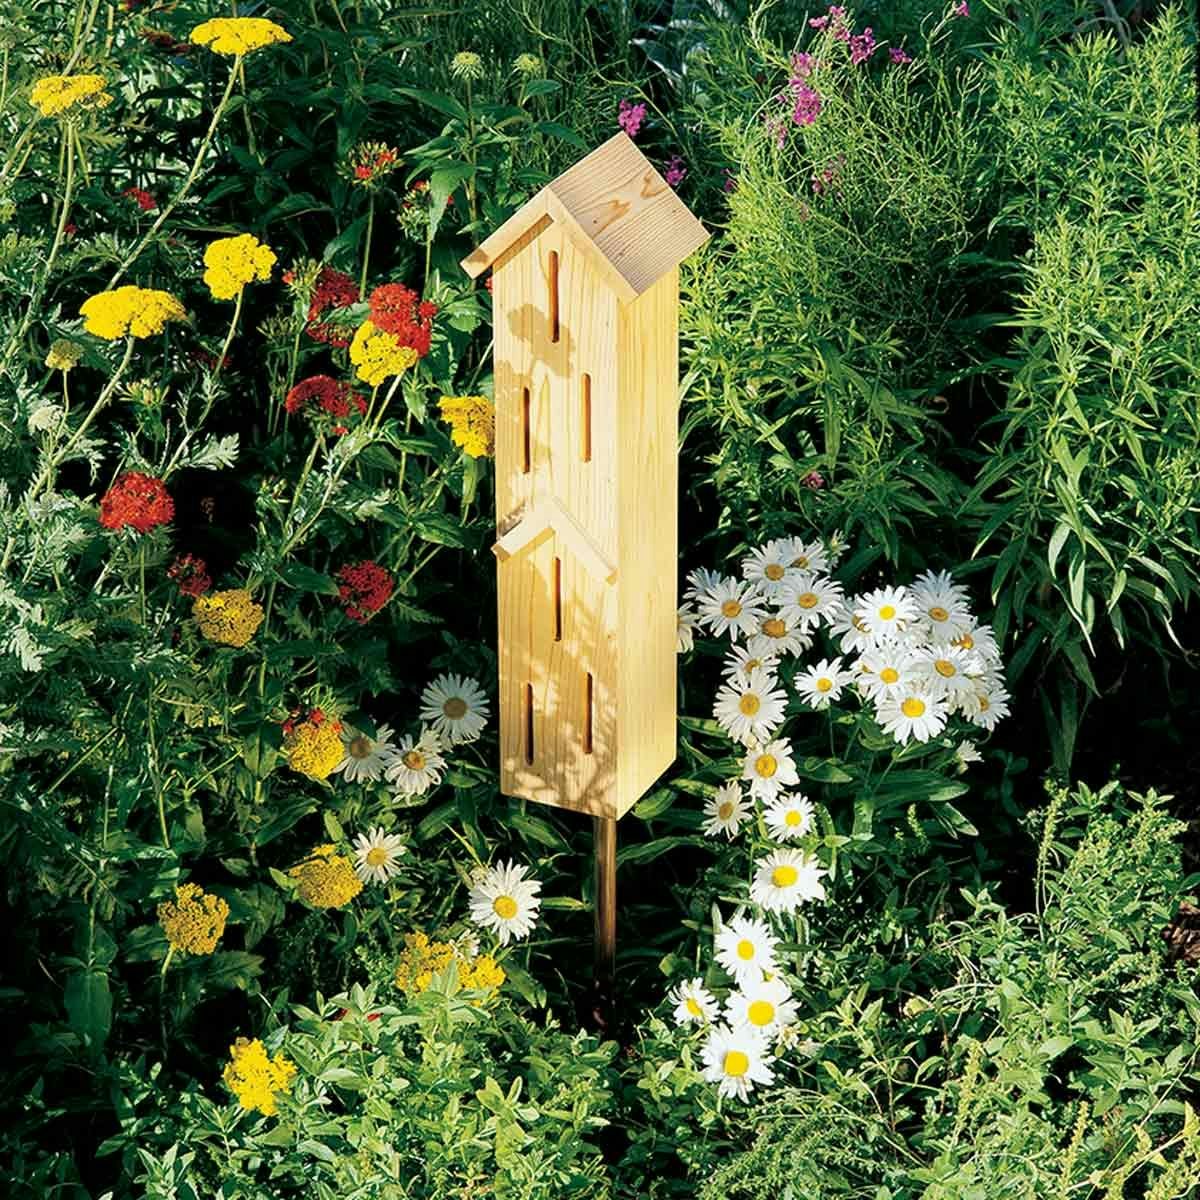
bat houses
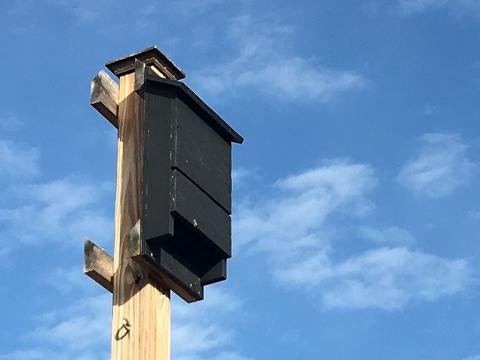
- Size and Chambers: A taller and wider bat house is generally better. Aim for a minimum of 24 inches tall and 14 inches wide, with multiple roosting chambers (baffles) spaced 3/4 to 1 inch apart.
- Rough Interior: The interior should be rough to allow bats to grip the surface easily. This can be achieved with grooved or textured surfaces on the roosting partitions.
- Venting: Proper ventilation is essential to prevent overheating. Vents should be incorporated near the base of the house to allow for airflow.
- Sealing: All seams and joints should be well-sealed to prevent drafts and maintain a warm, dry interior.
- Dark Exterior: Painting the bat house a dark color (like black or dark brown) or using roofing paper helps it absorb more heat from the sun, which is important for roosting bats.
- Placement: Bat houses should be placed in a sunny location, ideally facing south or east, and mounted at least 12 feet above the ground on a pole or building.
- Landing Area: A landing area extending below the entrance is helpful for bats to land and enter the house.
- Proximity to Water: Bats need a water source, so placing the house within 1/2 mile of a permanent water source can be beneficial.
- Avoid Trees: While some bats roost in trees, bat houses are generally more successful when mounted on poles or buildings, as they offer better protection from predators and fluctuating temperatures.
How to build a bat house (National Wildlife Federation)
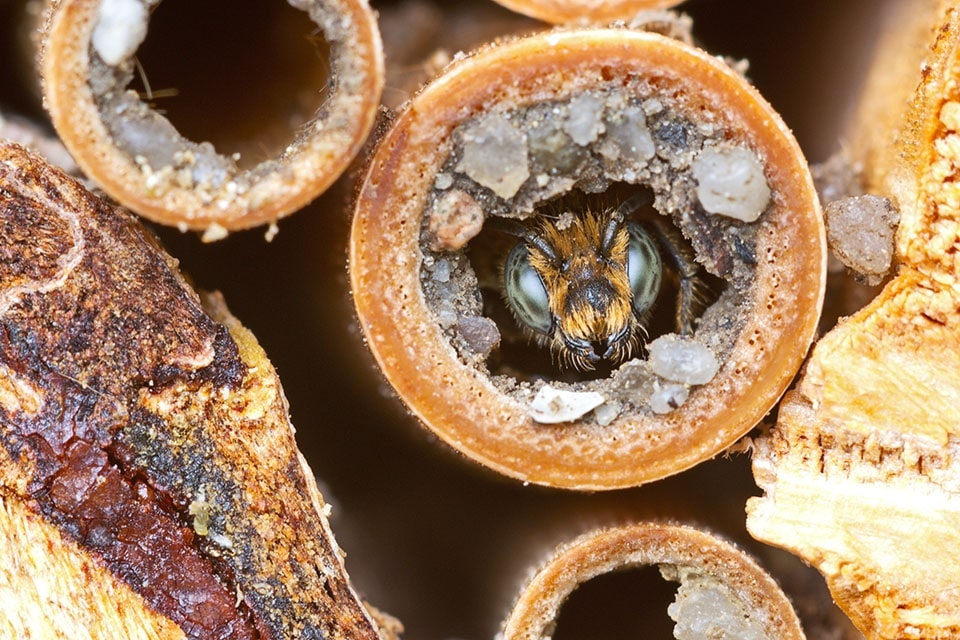
bee houses
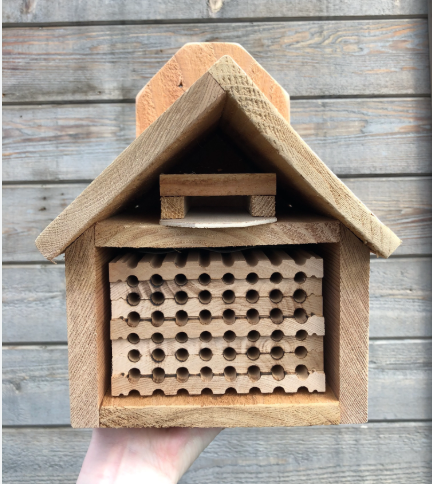
Unlike the hives required for honeybees, our native solitary bees such as the Mason Bee require a much simpler setup. You can get mason bee houses specifically made to the correct specifications from Linn Master Gardeners, or build your own. Here are some basic requirements:
- Location: Sheltered from wind and rain; south or southeast-facing for morning sun exposure; at least 3 feet (ideally 5-8 feet) above the ground; within 200-300 feet of a nectar source.
- House Design: Solid back to prevent light penetration; overhang to protect nesting tubes from rain; tubes or cavities should be 5/16 inch in diameter and at least 4 inches deep, ideally 6 inches; one end of the tube should be sealed (at the back of the house) to prevent parasites.
- Nesting Material: Cardboard tubes, bamboo tubes, or natural reeds are suitable. Avoid plastic or glass tubes due to condensation and mold issues.
- Mud Source: A nearby source of moist, clay-rich soil is essential for nest construction. The soil should be kept damp, especially in hot climates.
- Maintenance: Replace nesting tubes annually to prevent parasite buildup. Remove and store cocoons in a cool, dry place over the winter.
Mason Bee house setup and harvesting (Linn Master Gardeners)
Nurturing Mason Bees in your Backyard (OSU Extension)
butterfly houses
- Entry Slits: Narrow, vertical slits allow butterflies to enter and exit while keeping out larger creatures like birds.
- Perches: Small branches, bark, or other textured surfaces inside provide resting spots for butterflies.
- Dry Interior: Features like a large overhang on the roof and drainage gaps help keep the inside dry, which is crucial for butterfly health.
- Easy Access for Cleaning: Find a house with side panels or a roof that open for easy cleaning and maintenance.
- Viewing Features: Some butterfly houses include viewing windows to observe butterflies emerging from chrysalises or displaying other parts of their lifecycle.
- Placement: Place near host plants for caterpillars and nectar-rich flowers for adult butterflies.
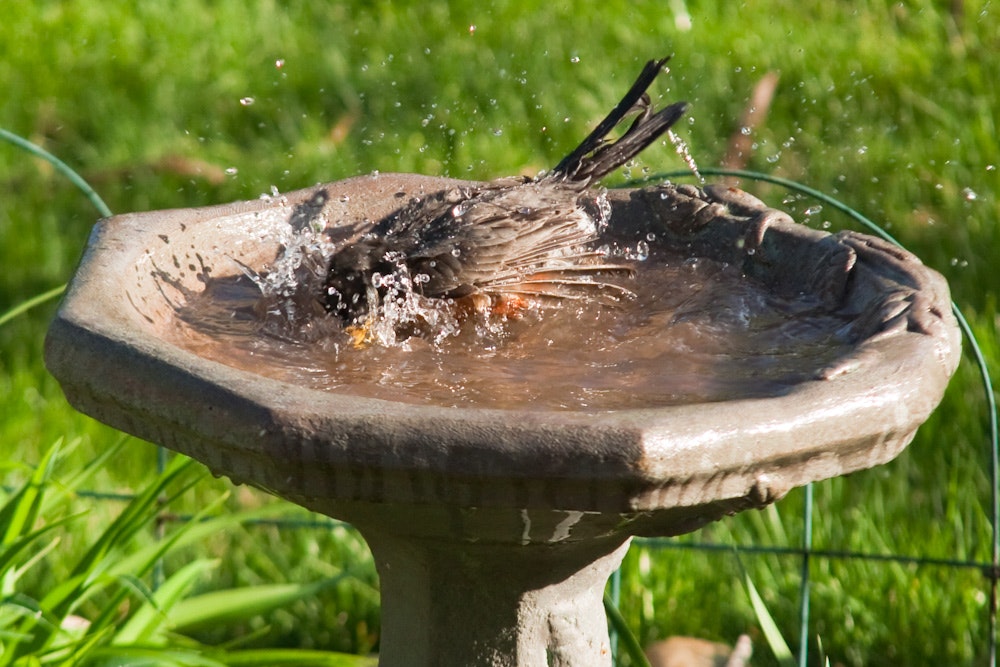
All animals—birds, insects, amphibians, mammals—need water to drink.
Birds need water for bathing, which helps maintain feather health for insulation and flight. Amphibians require moist environments to breathe and reproduce. Bees and butterflies need access to shallow water for hydration and minerals. Dragonflies, damselflies, and other insects rely on water to complete their life cycles.
Here are some ways to provide a clean water source for wildlife all year long:
Use Birdbaths or Shallow Dishes
- Choose a shallow basin (1–2" deep) with sloped sides or rocks for safe perching.
- Place it in a shaded, open area where animals can see predators coming.
- Clean and refill with fresh water daily or every few days.
Add Moving Water
- Use a solar fountain, dripper, or recirculating pump to attract birds and reduce mosquito breeding.
- Flowing water also keeps the surface cleaner and more oxygenated.
Provide Safe Access for Insects
- Add pebbles, corks, or floating sticks to dishes so bees, butterflies, and small insects can land safely.
- Place small trays on or near flowering plants.
Keep It Clean
- Scrub birdbaths and containers with a 9:1 water-to-vinegar solution weekly.
- Prevent algae buildup by cleaning and changing the water regularly, especially in warm weather.
Winter Water Strategies
- Use a heated birdbath or add a birdbath de-icer to prevent freezing.
- Or, place warm water out regularly in insulated containers.
- Never use antifreeze—it's toxic to all animals.
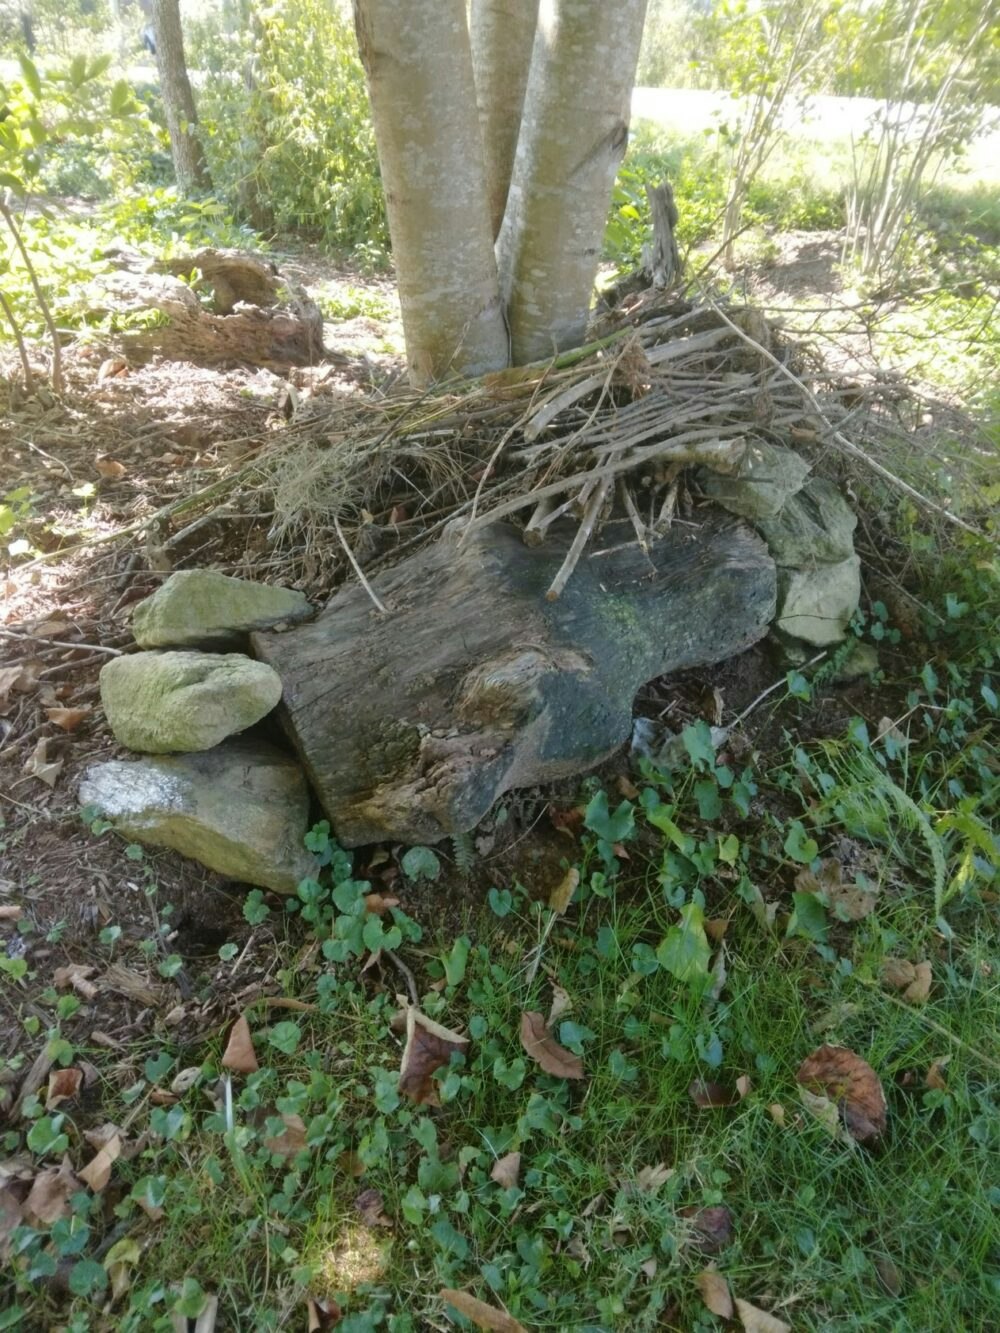
This may be one of the easiest features to add to your habitat, and a highly impactful one! Rocks and brush create shelter, nesting sites, and foraging opportunities for small mammals, birds, reptiles, and amphibians.
These piles need not be huge to be effective (although, the bigger the better). Start with some larger rocks or logs, and add progressively smaller ones on top. Make sure there are some open spaces between the pieces.
For an added bonus, top off the pile with loose brush, pine boughs, or even discarded pieces from your Christmas tree. That's it!
Learn more:
How to build a habitat pile (YouTube)
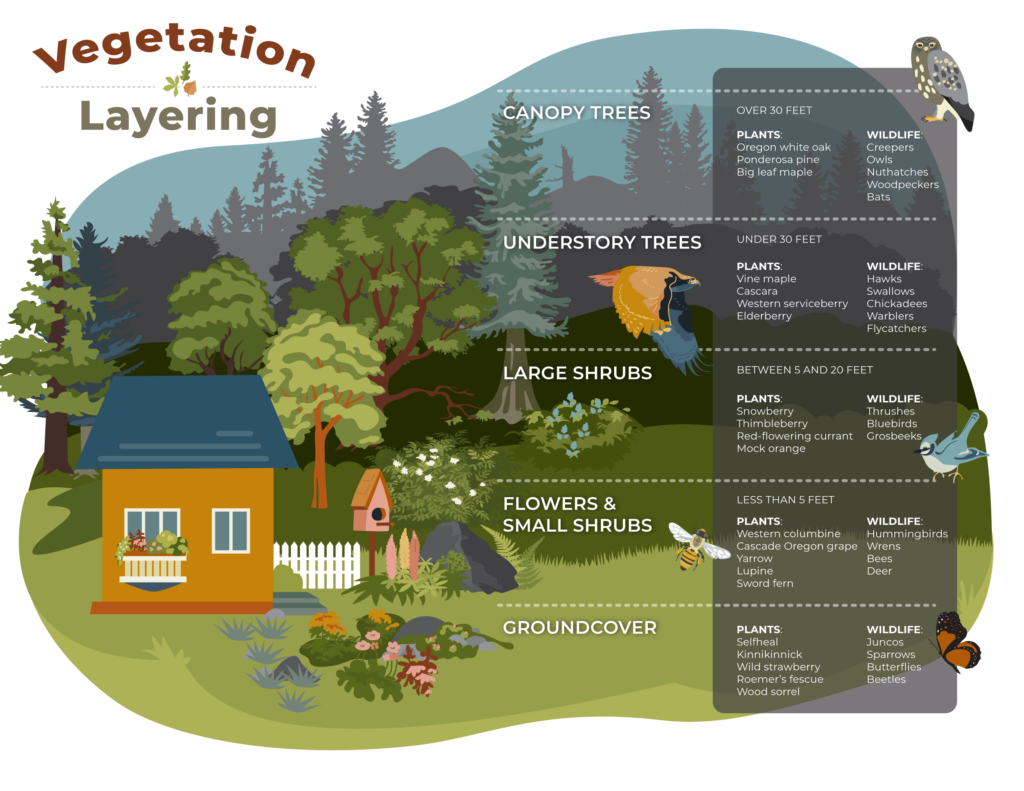
Vegetation layers refer to the heights of different types of plants in your habitat.
These are important because different types of wildlife find food and shelter in different heights. Some species can only exist in one specific layer. Others travel between many layers throughout the season or their lifetimes.
To be certified as a Nature Neighbor, your habitat should include at least 3 of the following types of vegetation:
Canopy Trees (Over 30 Feet) such as:
- Oregon white oak
- Ponderosa pine
- Big leaf maple
Understory Trees (Under 30 Feet) such as:
- Vine maple
- Cascara
- Western serviceberry
- Elderberry
Large Shrubs (Between 5 and 20 Feet) such as:
- Snowberry
- Thimbleberry
- Red-flowering currant
- Mock orange
Flowering & Small Shrubs (Less Than 5 Feet) such as:
- Western columbine
- Cascade Oregon grape
- Yarrow
- Lupine
- Sword fern
Groundcover (less than 12 inches) such as:
- Selfheal
- Kinnikinnick
- Wild strawberry
- Roemer’s fescue
- Wood sorrel

Replacing outdoor lights with amber bulbs protects nocturnal wildlife by reducing blue light emissions, which are highly disruptive to animal navigation, foraging, and mating behaviors. Unlike harsh white tones, amber lights produce longer wavelengths, which are less attractive to insects and are less likely to disorient bats ormigrating birds.
Look for bulbs with a kelvin number (K) of less than 3000K. This relates to the color of the lighting, and a lower number means the bulb will be more yellow, amber or orange. You can look for softer lights with lower lumens, too.
As an added bonus, lower-wattage bulbs also last longer and consume less energy!
For maximum wildlife benefits, combine amber bulbs with shielded fixtures that direct light downward instead of outward.


.png?ixlib=rb-1.1.0&or=0&w=720&h=411&fit=fill&fill=blur&auto=format%2Ccompress&s=eb9f4bd878a81bc2f897cf0a1cbf77f4)
